7 Mistakes with Creamy Pasta Emulsification (The Hack)
Why Your Creamy Pasta Splits Every Single Time
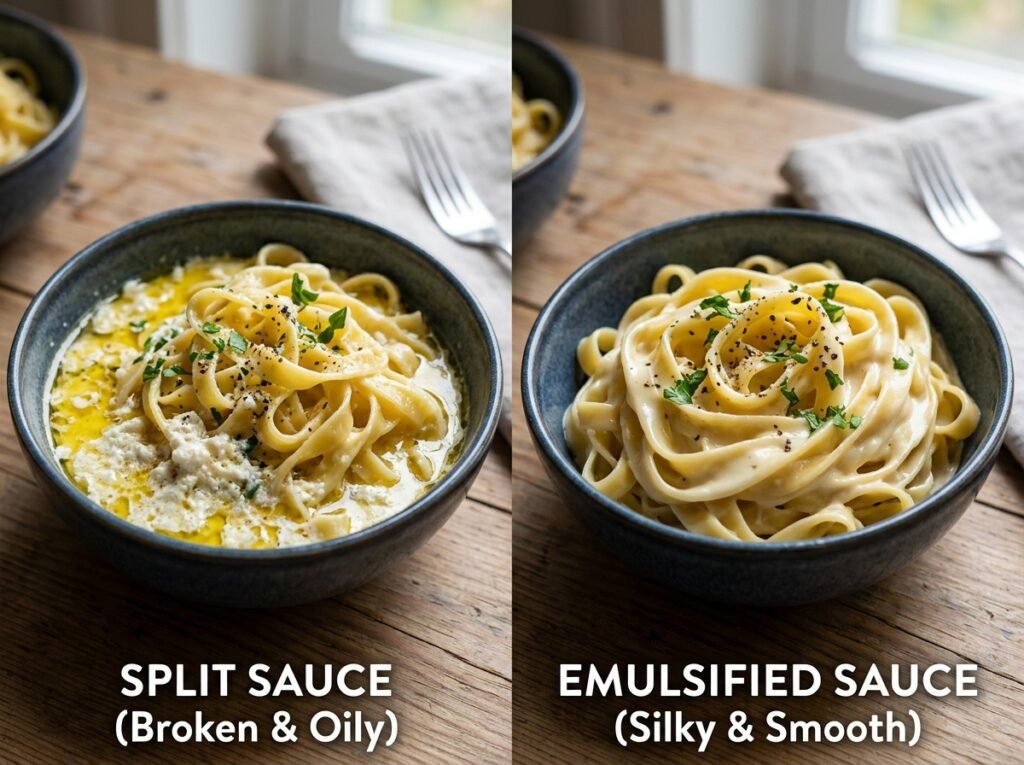
Creamy Pasta Emulsification is the secret behind every 5-star restaurant dish, yet most home cooks end up with a broken, oily mess. You drain the pasta. You add butter and cream. You toss everything together with hope in your heart and a wooden spoon in your hand. And then it happens — that glossy, restaurant-quality sauce you imagined splits into a greasy puddle with sad, naked noodles floating in oil.
I have tested this method across dozens of batches, adjusting one variable at a time to isolate exactly what makes the difference between a silky emulsion and a broken mess. The answer is not more cream. It is not more cheese. It is something most home cooks pour straight down the drain without a second thought.
Here is what keeps going wrong: we treat pasta water like waste. We ignore temperature. We add cheese like we are burying a body — all at once, in a panic, hoping it just works out. It does not.
The fix is simpler than you think, but it requires understanding one fundamental principle of kitchen chemistry: emulsification. Once you see how starch, fat, and heat work together, you will never make watery, broken, or oily pasta again.
The Science Behind the Emulsification Hack
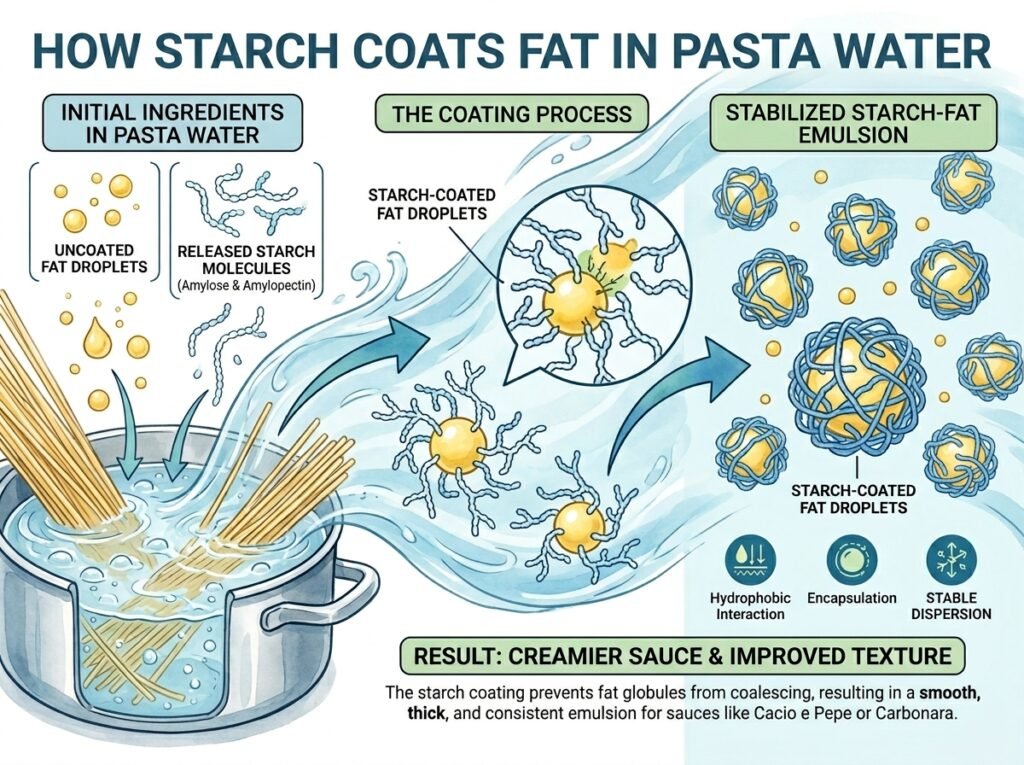
Emulsification is the process of convincing two things that hate each other — fat and water — to hold hands and stay together. In creamy pasta, your enemies are butter or oil (fat) and the starchy pasta cooking water (water). Left alone, they separate. But introduce starch and a little mechanical action, and magic happens.
When pasta cooks, it releases starch molecules into the boiling water. These molecules are long chains that, when heated, undergo starch gelatinization — they swell, soften, and thicken the water. This starchy water becomes a natural emulsifier.
At the same time, proteins in butter and cheese undergo protein denaturation when exposed to heat. This is a good thing in controlled doses — it helps them integrate into the sauce. But too much heat or the wrong order of operations, and those proteins clump, squeeze out moisture, and leave you with grainy, broken sadness.
The chemical relationship can be simplified like this:
Fats+Starch Water→Stable Emulsion
In simple terms: the starch acts like a mediator. It coats the fat droplets and suspends them in water, creating a creamy, cohesive sauce that clings to every strand of pasta. This is why pasta water is often called “liquid gold” — it is the secret ingredient hiding in plain sight.
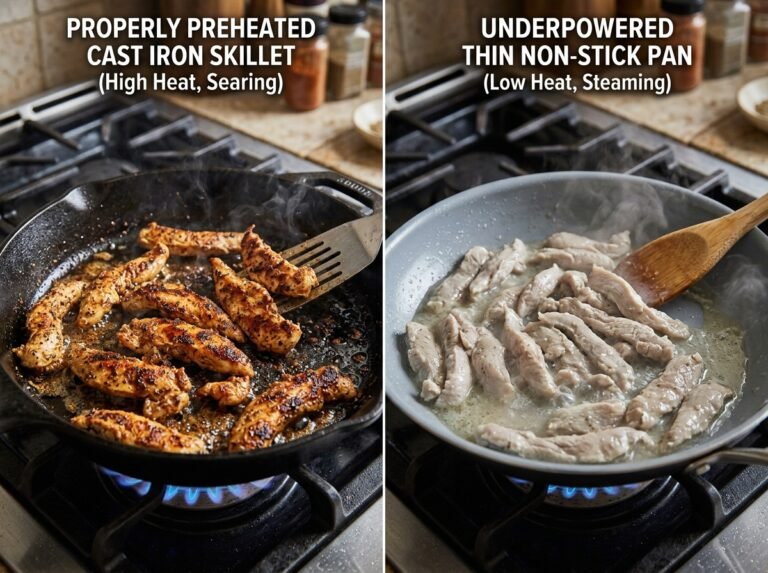
Temperature control is just as critical. Add cold butter to hot pasta, and it melts unevenly. Add cheese to boiling liquid, and the proteins seize. The sweet spot is around 160–180°F (71–82°C) — hot enough to melt and emulsify, but cool enough to stay smooths.
Pro Buying Guide: The Best Ingredients for Restaurant-Quality Creamy Pasta (USA)
Not all pasta is created equal. If you want a sauce that clings and does not slide off like it is coated in Teflon, you need bronze-cut pasta. Brands like De Cecco and Rustichella d’Abruzzo have a rough, porous surface that grabs onto sauce. You can find De Cecco at nearly every Kroger, Target, and Whole Foods across the country. Smooth, extruded pasta might be cheaper, but it is also slicker — sauce just rolls right off.
For butter, I always reach for Kerrygold or Plugrá. Both are European-style butters with higher fat content (82% vs. the standard 80%), which means richer flavor and better emulsification. Whole Foods and Trader Joe’s stock both. If you are at Walmart, look for Land O’Lakes Extra Creamy Butter — it is a solid domestic alternative.
Cheese is where people get reckless. BelGioioso Parmigiano-Reggiano is my go-to at Trader Joe’s — it is aged, nutty, and melts beautifully when added off-heat. Avoid pre-shredded cheese. The anti-caking agents (usually cellulose) prevent smooth melting and make your sauce gritty.
If you are adding cream, go for heavy cream (36–40% fat), not half-and-half. You will find reliable options like Organic Valley or Horizon Organic at most Kroger and Safeway locations. The higher the fat content, the more stable your emulsion.
For finishing, grab a bottle of good olive oil — I love California Olive Ranch (widely available at Target) for its clean, fruity finish. A drizzle at the end adds gloss and depth without breaking the sauce.
Ingredients
| Ingredient | US Customary | Metric |
|---|---|---|
| Pasta (bronze-cut preferred) | 12 oz | 340g |
| Unsalted butter (Kerrygold or Plugrá) | 4 tbsp | 60g |
| Heavy cream | ½ cup | 120ml |
| Parmigiano-Reggiano, finely grated | 1 cup | 100g |
| Pasta cooking water (reserved) | 1–1½ cups | 240–360ml |
| Garlic, minced | 3 cloves | 3 cloves |
| Kosher salt | 1 tbsp (for pasta water) | 15g |
| Black pepper, freshly cracked | ½ tsp | 1g |
| Extra virgin olive oil | 2 tbsp | 30ml |
Common Mistakes Table
| Mistake | What Actually Happens | The Fix |
|---|---|---|
| Draining all the pasta water | You lose your emulsifier; sauce stays thin and oily | Reserve 1–2 cups before draining |
| Adding cheese to boiling liquid | Proteins seize and clump; sauce turns grainy | Remove from heat, let cool to ~170°F, then add cheese slowly |
| Using pre-shredded cheese | Anti-caking agents prevent melting; sauce stays gritty | Grate fresh Parmigiano yourself |
| Not salting pasta water enough | Pasta tastes bland; you oversalt sauce to compensate | Use 1 tbsp salt per 4 quarts water |
| Adding butter and cheese at the same time | Uneven melting; sauce separates | Add butter first, emulsify, then add cheese off-heat |
| Rinsing pasta after draining | Washes away surface starch; sauce will not cling | Never rinse pasta meant for sauce |
| Using low-fat or skim products | Not enough fat to form stable emulsion; sauce breaks | Stick to full-fat butter, cream, and cheese |
The Step-by-Step Method: Building a Silky Emulsion
Step 1: Salt Your Water Like the Ocean
Bring 4 quarts (about 3.8 liters) of water to a rolling boil. Add 1 tablespoon of kosher salt. It should taste like seawater — not subtle, not shy. This is your only chance to season the pasta from the inside out. Undersalted pasta means you will overcompensate later and throw off the emulsion balance.
Drop in your bronze-cut pasta and stir once to prevent sticking. Set a timer for 2 minutes less than the package directions. You want the pasta just shy of al dente — it will finish cooking in the sauce.
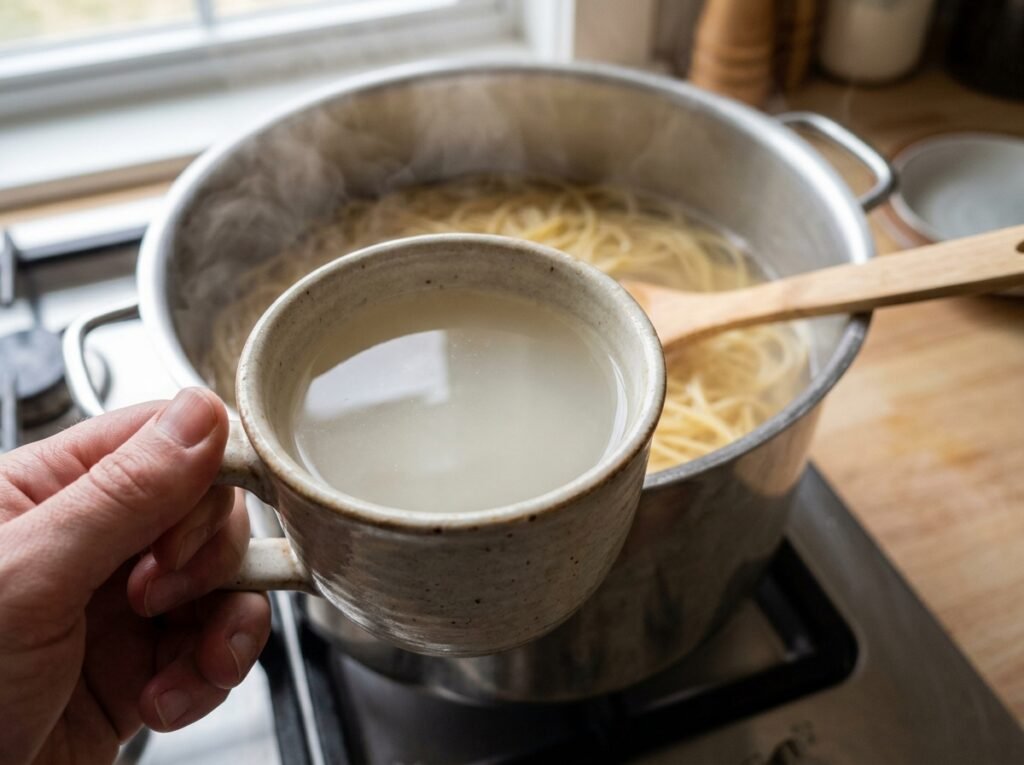
Step 2: Reserve the Liquid Gold
About 3 minutes before your pasta is done, grab a heatproof measuring cup or mug and scoop out at least 1½ cups (360ml) of pasta water. This cloudy, starchy liquid is your insurance policy. It is what will bring your sauce together, adjust consistency, and save you if things start to break.
Do not skip this step. I cannot tell you how many times I have watched someone drain pasta, realize they forgot to save the water, and try to add tap water instead. It does not work. Tap water has no starch. No starch means no emulsion.
Step 3: Heat Your Pan, Bloom Your Garlic
While the pasta finishes, heat a large skillet over medium-low heat. Add 2 tablespoons of olive oil and your minced garlic. Let it sizzle gently for about 45 seconds — just until fragrant, not brown. Burnt garlic is bitter and will ruin everything.
This step is about building a flavor base. The oil carries the garlic’s aromatics and prepares the pan for emulsification.
Step 4: Add Butter and Pasta Water — Start the Emulsion
Turn the heat to low. Add your 4 tablespoons of butter and ½ cup (120ml) of the reserved pasta water. Swirl the pan gently. You will see the butter start to melt and blend with the water. It will look a little milky and loose — that is exactly right.
The starch in the water is beginning to coat the fat molecules. Keep swirling. Do not stir aggressively. You are coaxing an emulsion, not beating it into submission.
Step 5: Add the Pasta — Let It Finish in the Sauce
Use tongs to transfer the pasta directly from the pot into the skillet. Yes, it will bring a little extra water with it. That is fine. Toss the pasta gently in the butter-water mixture. Let it cook for 1–2 minutes, adding splashes of pasta water as needed to keep things loose and glossy.
The pasta is absorbing the sauce and releasing even more starch. You are building layers of flavor and texture. This is how Italian grandmothers do it — they finish pasta in the pan, not the colander.
![[Food Hacks Hub]](https://qorly.shop/wp-content/uploads/2026/05/Pasta_tossed_in_skillet_Food-Hacks-Hub202605130129-1024x765.jpeg)
Step 6: Add Cream (Optional, but Luxurious)
If you want an even richer sauce, add your ½ cup (120ml) of heavy cream now. Toss to combine. The cream adds body and a silky mouthfeel, but it is not required. A proper emulsion of butter, pasta water, and cheese is already creamy on its own.
Let everything simmer gently for 30–45 seconds. You will see the sauce start to thicken and cling to the noodles.
Step 7: Remove from Heat and Add Cheese Slowly
This is the most important step. Turn off the heat. Let the pan sit for 20–30 seconds so the temperature drops to around 170°F (77°C). Then, add your grated Parmigiano a small handful at a time, tossing constantly.
If you dump it all in at once, or if the pan is too hot, the proteins will seize and your sauce will turn into a clumpy, greasy disaster. Slow and steady wins the emulsion.
Add pasta water by the tablespoon if the sauce tightens too much. You want it to coat the back of a spoon and cling to each strand like velvet.
Step 8: Taste, Adjust, and Finish
Taste your pasta. Does it need salt? Pepper? A little more cheese? Adjust now. Finish with a drizzle of your best olive oil and a few cracks of black pepper.
The olive oil adds a final layer of richness and gloss. It is the chef’s kiss — literally.


7 Mistakes Everyone Makes with Creamy Pasta (The Emulsification Hack)
Ingredients
Equipment
Method
- Boil pasta in 20% less water than usual to maximize starch density. Cook until 2 minutes before “Al Dente.”
- Scoop out 1.5 cups of pasta water before draining. DO NOT rinse the pasta.
- In a wide skillet, melt butter over medium-low heat. Sauté garlic for 60 seconds until fragrant.
- Whisk 1/2 cup of pasta water into the melted butter until it turns milky and unified.
- Add hot pasta to the skillet. Increase heat to medium. Toss vigorously for 1 minute to release surface starches.
- Turn heat OFF. Add cheese in small batches, tossing constantly. Use remaining pasta water to adjust the “velvet” consistency.
Notes
- The “Liquid Gold” Secret: Never drain your pasta in the sink! The cloudy water left behind is packed with starch. This is the only way to get a velvet-smooth sauce without it becoming oily. If you forget to save it, you cannot fix the sauce with regular tap water.
- The 2-Minute Rule: Always pull your pasta out of the boiling water 2 minutes before it reaches “Al Dente.” It will finish cooking in the skillet while absorbing the sauce, which infuses the flavor directly into the pasta.
- Cheese Quality Warning: Avoid the “Green Can” or pre-shredded bags from Walmart or Kroger. They contain potato starch and cellulose to prevent clumping, which will make your sauce grainy. Buy a wedge of Parmigiano-Reggiano and grate it fresh.
- Temperature Control: If the pan is too hot when you add the cheese, the proteins will tighten and clump together, causing the sauce to “break” (separate into oil and solids). Always turn the heat OFF before the final cheese fold.
- Pasta Selection: Look for “Bronze-Cut” (Bronzo) pasta labels at Whole Foods or Trader Joe’s. The rough texture acts like “velcro” for the sauce, ensuring every strand is perfectly coated.
- Reheating Tip: Creamy pasta does not like microwaves. To reheat, place in a skillet over low heat with 2 tablespoons of milk or water and toss gently until the emulsion re-forms.
Chef John’s Insight
“Emulsification is not a trick — it is a conversation. You are asking fat and water to trust each other, and the only language they both speak is starch and gentle heat. I have made this pasta a hundred times, and every single batch teaches me something new about patience. The sauce does not come together because you force it. It comes together because you wait, you watch, and you respect the process. There is a kind of culinary grace in that moment when the sauce shifts from broken to unified. It is the same grace you find in any good relationship: timing, temperature, and knowing when to step back and let things be.”
— Chef John
Nutrition Information (Per Serving, Serves 4)
| Nutrient | Amount |
|---|---|
| Calories | 520 kcal |
| Protein | 18g |
| Total Fat | 24g |
| Saturated Fat | 14g |
| Carbohydrates | 56g |
| Sodium | 480mg |
| Cholesterol | 65mg |
Note: Nutritional values are estimates and will vary based on specific brands and portion sizes.
Food Safety & Temperature Guide
| Stage | Temperature | USDA Notes |
|---|---|---|
| Boiling pasta water | 212°F / 100°C | Full rolling boil |
| Emulsification zone | 160–180°F / 71–82°C | Ideal for melting cheese without seizing |
| Danger zone (avoid) | 40–140°F / 4–60°C | Bacteria multiply rapidly; do not hold cooked pasta here |
| Safe reheating temp | 165°F / 74°C | USDA minimum for reheating leftovers |
To understand the molecular chemistry behind how starch binds fa
Storage & Reheating Guide
| State | Fridge | Freezer | Best Reheat Method |
|---|---|---|---|
| Cooked pasta with sauce | 3–4 days in airtight container | Not recommended (cream sauces separate) | Stovetop with 2–3 tbsp pasta water or milk, low heat, toss gently |
| Unsauced cooked pasta | 4–5 days, tossed in olive oil | Up to 2 months | Boil fresh water, dunk pasta for 30 seconds, then toss in fresh sauce |
FAQ: Your Top Creamy Pasta Questions Answered
Can I use milk instead of cream?
You can, but your sauce will be thinner and less stable. Milk has lower fat content, so it is harder to emulsify. If you go this route, add an extra tablespoon of butter and a bit more pasta water to compensate.
What if my sauce breaks after I add the cheese?
Do not panic. Add 2–3 tablespoons of hot pasta water and toss vigorously off the heat. The starch will help re-emulsify. If it is really bad, transfer everything to a blender, add a splash of cream, and blitz for 10 seconds.
Can I make this ahead?
Creamy pasta is best served immediately. Emulsions are fragile and will break down as they sit. If you must make it ahead, undercook the pasta slightly and store it separately from the sauce. Reheat gently and combine just before serving.
Do I really need bronze-cut pasta?
You do not need it, but it makes a noticeable difference. The rough texture holds onto sauce much better than smooth pasta. If you only have regular pasta, just make sure you do not rinse it after draining — you need every bit of surface starch you can get.
Can I use this technique with dairy-free alternatives?
Yes, but choose high-fat options. Use a good vegan butter (like Miyoko’s) and full-fat coconut cream or cashew cream. Nutritional yeast can stand in for cheese, though it will not melt the same way. The emulsification principle still applies — starch plus fat plus gentle heat.
More Creamy, Dreamy Recipes You’ll Love
[7 Amazing Crispy Air Fryer Chicken Wings Recipe]
[Easy Mexican Street Corn Salad Recipe – Ultimate Summer Side Dish]
[Easy Crispy Honey Garlic Chicken Bites Recipe]
[4 Secret Reasons Your Chicken Coating Falls Off]