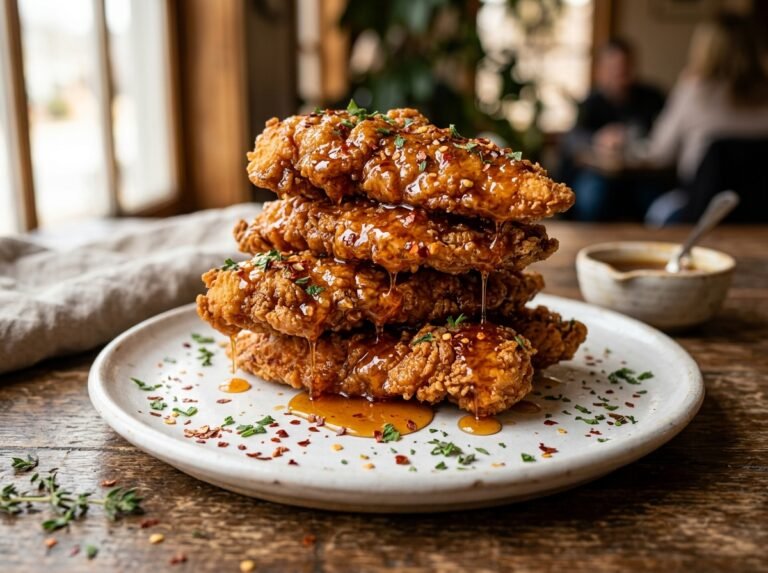
4 Secret Reasons Your Chicken Coating Falls Off
There is nothing more heartbreaking than lifting a piece of golden-fried chicken from hot oil, only to watch the crust slide away like a failed dream. If you have ever wondered why chicken coating falls off despite following the recipe, you are not alone. It pools at the bottom of the pan, leaving behind pale, naked meat that mocks your effort.and Why Chicken Coating Falls Off
I have spent years adjusting ratios and oil temperatures in my test kitchen to pinpoint exactly why that beautiful breading fails. The answer is never just one thing—it is a chain reaction of small mistakes. Once you understand the science of why chicken coating falls off, you can fix the process and ensure your coating never betrays you again.
By the end of this article, you will know the exact science behind coating adhesion, the four critical mistakes that sabotage your crust, and the precise techniques that create an indestructible bond. Let’s fix this chicken coating falls off problem once and for all.
The Hidden Science Behind Why Your Coating Won’t Stick
When you dredge chicken in flour and lower it into hot oil, you are not just cooking—you are managing a complex physical reaction between moisture, protein, starch, and heat. The coating only adheres when three conditions align perfectly: a dry protein surface, proper flour hydration, and immediate heat to set the structure.
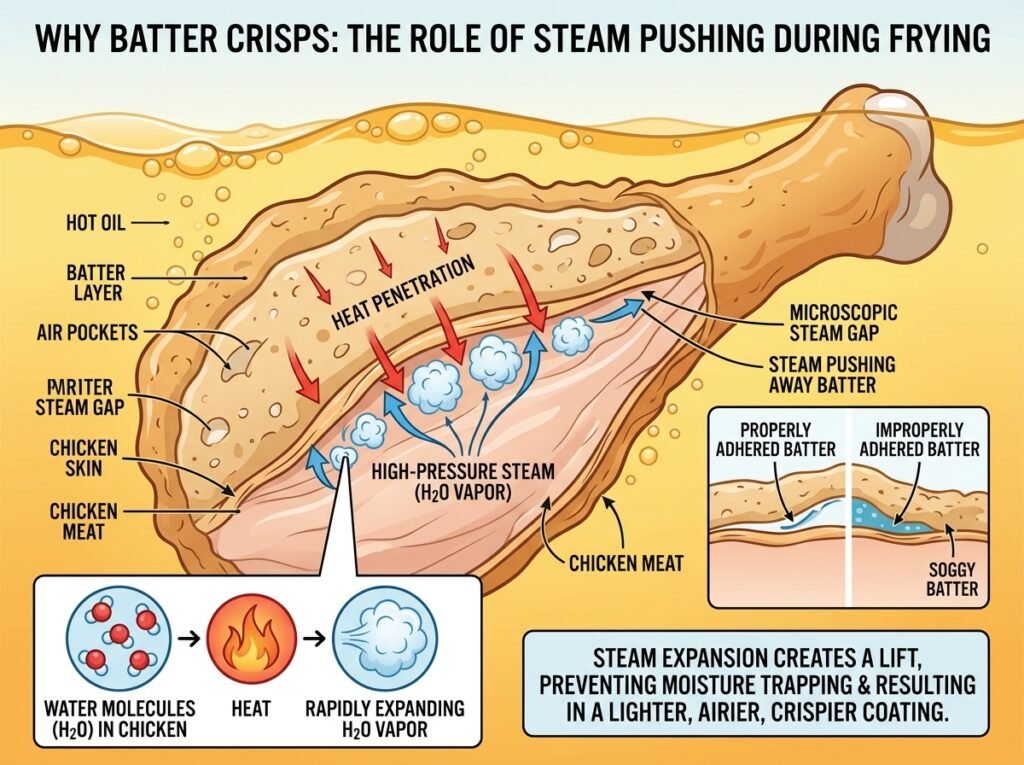
Here is what most cooks miss. The surface of raw chicken is covered in a thin film of moisture. When that wet surface meets hot oil, the water instantly converts to steam. Steam is a powerful force—it creates a barrier between the meat and the coating, physically pushing the crust away. This is called the Steam Barrier Effect, and it is the number one reason coatings fail.
But there is more. Flour needs moisture to gelatinize and form a tight matrix. If the chicken is too wet, the flour becomes a slurry that never sets. If it is too dry, the flour has nothing to grip. The magic happens when a controlled amount of moisture hydrates the starch granules in the flour, and then heat locks them in place through protein denaturation.
In simple terms: the proteins in both the chicken and the coating need to bond under heat, creating a unified crust. When steam, excess water, or insufficient heat interferes, that bond never forms.
Here is the process in one equation:
Flour Hydration+Heat→Set Coating
If either side of this equation is off—too much water, not enough heat, wrong timing—the coating slips right off.
Pro Buying Guide: The Right Tools and Ingredients Make All the Difference
Let me be clear: you do not need fancy equipment to nail fried chicken. But a few strategic choices at the grocery store can eliminate half your problems before you even start cooking.
Cast Iron Matters More Than You Think
I use a Lodge Cast Iron skillet for all my frying. You can grab one at Walmart or Target for under $30, and it will last your entire life. Cast iron holds heat better than any other cookware, which means your oil temperature stays stable even when you add cold chicken. Temperature swings are a major cause of coating failure, and cast iron solves that.
The Flour You Choose Changes Everything
Not all all-purpose flour is created equal. I reach for Bob’s Red Mill All-Purpose Flour every time. It has a slightly higher protein content than generic brands, which means better structure and adhesion. You can find it at Kroger, Whole Foods, or order it in bulk online. If you want an extra crispy coating, add 2 tablespoons of cornstarch to every cup of flour—it creates a lighter, crunchier crust.
Air-Chilled Chicken Is a Game Changer
Here is something most recipes will not tell you: the chicken itself matters. Conventionally processed chicken is water-chilled, which means it absorbs extra moisture. That moisture is your enemy. Look for air-chilled chicken at Whole Foods, Trader Joe’s, or higher-end sections of Kroger. It costs a bit more, but the difference in coating adhesion is dramatic.
Oil Selection
I always use peanut oil or canola oil for frying. Both have high smoke points (around 450°F / 232°C), neutral flavor, and stay stable during repeated heating. You can get a gallon of canola oil at Walmart for less than $10. Avoid olive oil—it smokes too easily and adds off-flavors.
Thermometer Is Non-Negotiable
If you are guessing at oil temperature, you are already losing. Get a digital instant-read thermometer (I like the ThermoPro TP03A, available on Amazon or at Target). Maintaining 350°F / 177°C is the difference between a coating that sets instantly and one that absorbs oil and slides off.
Ingredients for Perfect Southern Fried Chicken
| Category | Ingredient | US Customary | Metric |
|---|---|---|---|
| Chicken | Bone-in chicken pieces | 3 lbs | 1.4 kg |
| Wet Mix | Buttermilk | 2 cups | 480 ml |
| Hot sauce | 1 tbsp | 15 ml | |
| Eggs | 2 large | 2 large | |
| Dry Mix | All-purpose flour | 2 cups | 250 g |
| Cornstarch | 4 tbsp | 32 g | |
| Salt | 1 tbsp | 18 g | |
| Black pepper | 1 tsp | 2 g | |
| Smoked paprika | 2 tsp | 5 g | |
| Garlic powder | 1 tsp | 3 g | |
| Onion powder | 1 tsp | 3 g | |
| Cayenne pepper (optional) | ½ tsp | 1 g | |
| Frying | Peanut or canola oil | 6 cups | 1.4 L |
The “Stop Doing This” Table: Common Mistakes That Ruin Your Coating
| The Mistake | What Actually Happens (Science) | The Chef John Fix |
|---|---|---|
| Skipping the dry-down | Surface moisture turns to steam in hot oil, creating a barrier that physically pushes the coating away from the meat. | Pat every piece bone-dry with paper towels. Wait 5 minutes, then pat again. Dryness = adhesion. |
| Using wet or slimy chicken | Excess water dilutes the flour into a slurry that never gelatinizes properly. The coating becomes a gummy paste. | Use air-chilled chicken or brine and dry thoroughly. If brined, let it air-dry uncovered in the fridge. |
| Crowding the pan | Oil temperature drops by 50°F+ when you add too much chicken. The coating absorbs oil instead of frying, then slides off. | Fry in small batches. Leave 2 inches / 5 cm between pieces. Patience pays. |
| Frying in cold or fluctuating oil | Below 325°F / 163°C, the coating never sets fast enough. It becomes greasy and fragile. | Preheat oil to exactly 350°F / 177°C and monitor constantly. Adjust heat between batches. |
| Moving the chicken too soon | The coating needs 90-120 seconds to form a crust. Flipping early tears the fragile bond before it sets. | Do not touch the chicken for the first 2 minutes. Let the crust form, then flip once. |
| Using only flour (no buttermilk step) | Flour alone has nothing to cling to. You need a tacky wet layer for the dry coating to grab onto. | Always use a buttermilk or egg wash before dredging. The wet layer is the glue. |
The Step-by-Step Method That Guarantees Adhesion
Step 1: The Dry Down
This is where most people fail before they even start. Take your chicken pieces straight from the package and lay them on a clean cutting board. Use several layers of paper towels and press firmly on every surface—skin side, meat side, crevices.
You are not just blotting. You are removing the enemy. Every drop of surface moisture will turn to steam and break the coating bond. After the first pass, let the chicken sit at room temperature for 5 minutes, then pat again. I know it feels excessive. Do it anyway.
Step 2: The Buttermilk Soak (Optional but Recommended)
Submerge the dried chicken in a mixture of buttermilk, hot sauce, and beaten eggs. This step serves two purposes: it tenderizes the meat with lactic acid, and it creates a sticky, protein-rich layer that the flour will cling to.
Let it soak for at least 30 minutes, or up to 4 hours in the fridge. When you pull the chicken out, let the excess buttermilk drip off, but do not rinse. You want a thin, tacky coating—not a puddle.
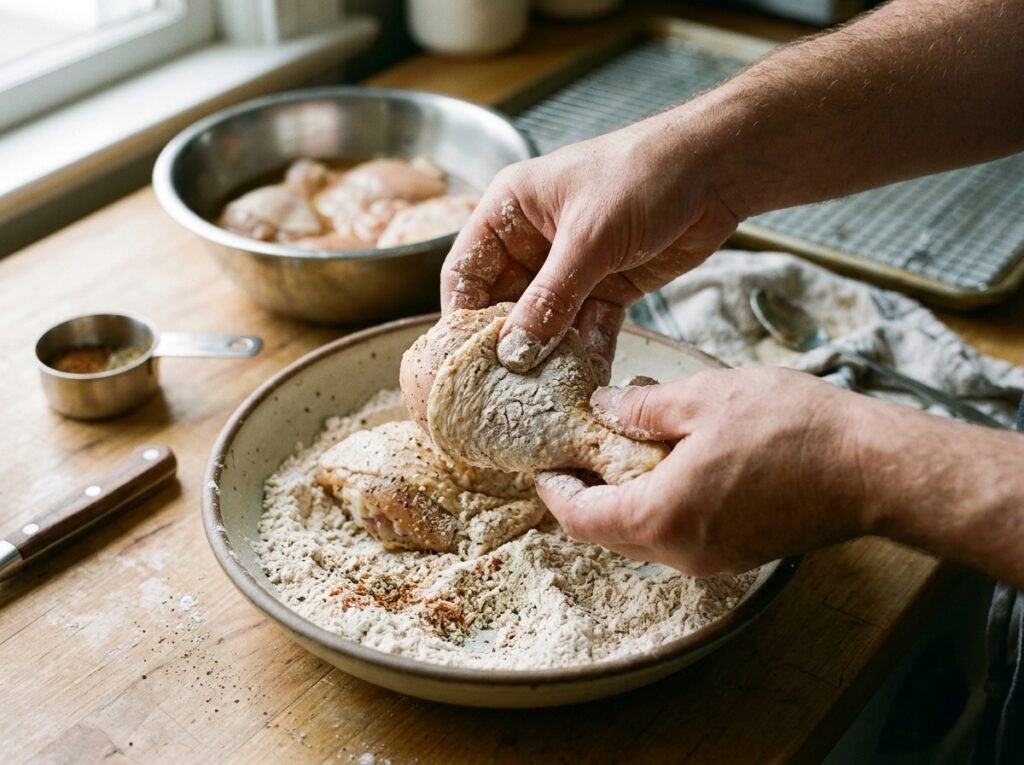
Step 3: The Dredge Press
Put your seasoned flour mixture in a wide, shallow dish. Take one piece of chicken at a time and press it firmly into the flour. Do not just drop it in and shake. Use your hands to pack the flour onto every surface, especially around joints and skin folds.
Flip it over and repeat. The goal is to create a tight, even layer with no bald spots. The flour should look almost like a second skin, not a dusty coatings.
Step 4: The Rest Period (The Secret Step)
Here is the move that separates amateurs from experts. After dredging, place the coated chicken on a wire rack set over a sheet pan. Let it rest for 15 minutes at room temperature.
During this time, the flour absorbs moisture from the buttermilk layer and begins to hydrate. The starch granules swell and form a preliminary bond. When this hydrated coating hits hot oil, it sets almost instantly into a hard shell. Skip this step, and your coating is fragile and prone to sliding.
Step 5: The Heat Check
Pour oil into your cast iron skillet to a depth of about 1 inch / 2.5 cm. Heat over medium-high until your thermometer reads exactly 350°F / 177°C.
Maillard reaction in deep frying
This is non-negotiable. Too low, and the coating absorbs oil and turns soggy. Too high, and the outside burns before the inside cooks, causing the crust to crack and fall away.
Drop in a pinch of flour to test—it should sizzle immediately and float, but not smoke.
Step 6: The Fry (No Touching!)
Gently lower the chicken into the oil, skin side down. Do not crowd the pan. Three to four pieces maximum.
Here is the hardest part: do nothing. Do not flip, nudge, or peek for at least 2 minutes. The coating needs time to form a crust. Moving it too early will tear the fragile bond.
After 2 minutes, check the underside. It should be deep golden. Flip once, then fry another 8-10 minutes, turning occasionally, until the internal temperature reaches 165°F / 74°C.
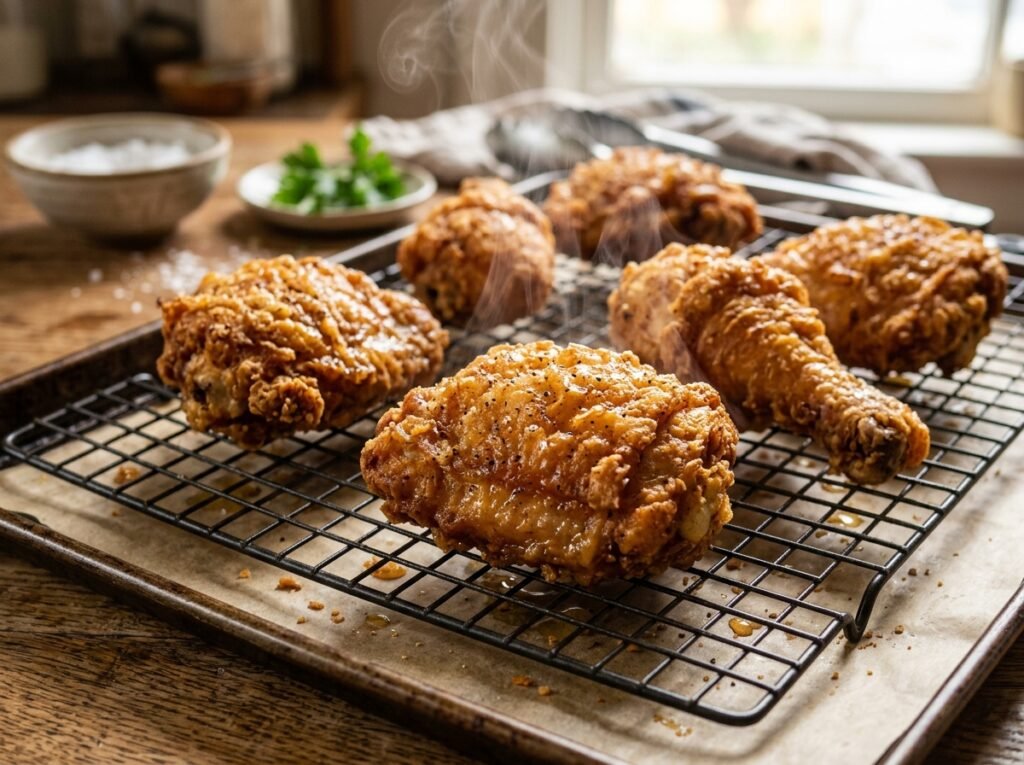
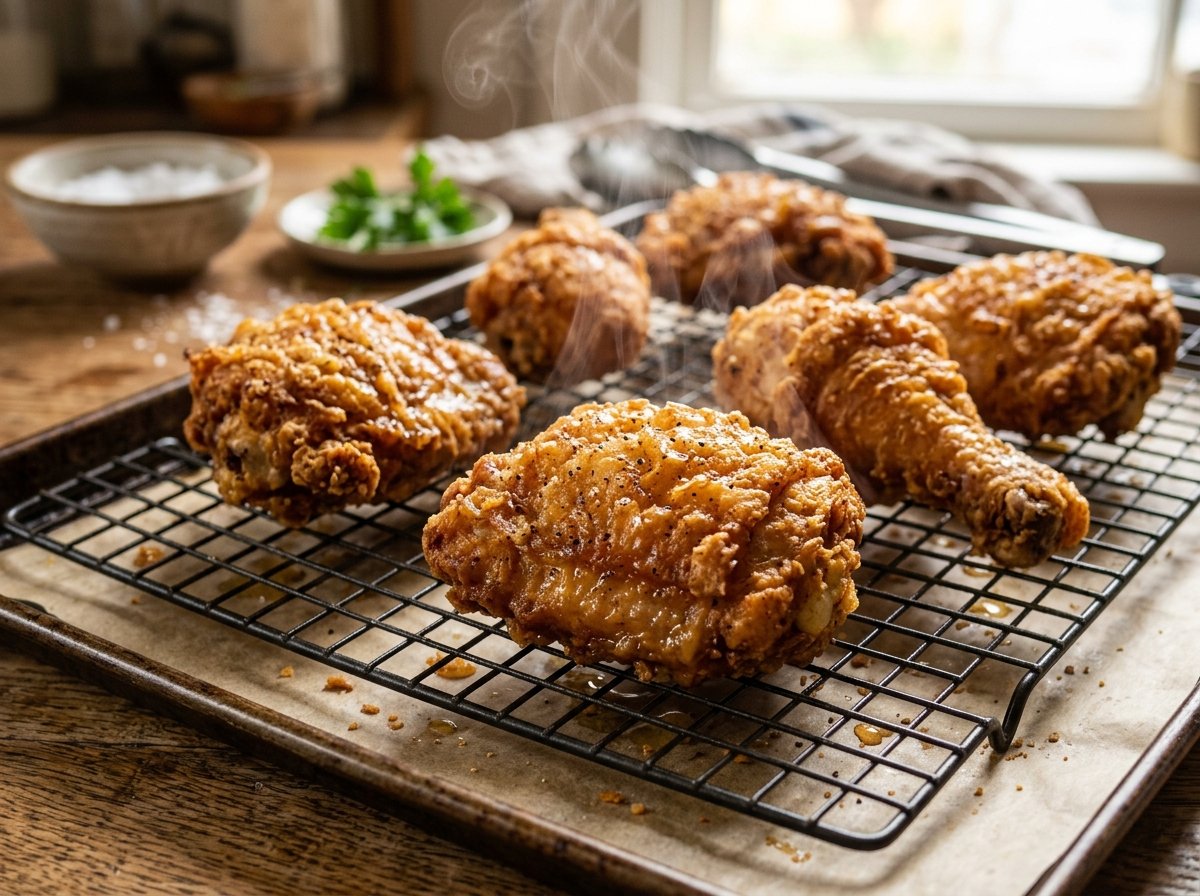
Step 7: Draining Correctly
This is where people ruin perfect chicken. Do not drain on paper towels—they trap steam and make the coating soggy. Use a wire rack set over a sheet pan. This allows air to circulate and keeps the crust crispy.
Let the chicken rest for 5 minutes before serving. The coating will finish setting, and the juices will redistribute.
Chef John’s Insight
Fried chicken taught me that perfection is not about speed. It is about respect for process. Every time I rush the dry-down or skip the rest period, the chicken reminds me. The coating slips. The crust fails. And I am humbled again. But when I slow down, when I honor each small step, the transformation is flawless. The buttermilk bonds to the meat. The flour hydrates into a shell. The heat locks it all in place. And what emerges is not just food—it is proof that patience and precision always win. The quiet steps are the powerful ones.
— Chef John
Nutrition Information (Per Serving, Estimated)
| Nutrient | Amount |
|---|---|
| Calories | 480 kcal |
| Protein | 32 g |
| Total Fat | 28 g |
| Saturated Fat | 6 g |
| Carbohydrates | 22 g |
| Sodium | 720 mg |
| Cholesterol | 145 mg |
Based on 6 servings. Actual values vary by piece size and frying time.
Food Safety Temperature Guide
| Stage | Temperature | Why It Matters |
|---|---|---|
| USDA Safe Minimum (Chicken) | 165°F / 74°C | Kills harmful bacteria like Salmonella. Non-negotiable. |
| Danger Zone (Do Not Hold Here) | 40°F – 140°F / 4°C – 60°C | Bacteria multiply rapidly in this range. Keep chicken cold or hot. |
| Ideal Frying Oil Temperature | 350°F / 177°C | Coating sets immediately without burning. Maintains crispness. |
| Resting Internal Temp (Carryover) | 160°F / 71°C (pulls at this temp) | Chicken will coast to 165°F / 74°C while resting. Prevents dryness. |
Storage & Reheating Guide
| State | Refrigerator | Freezer | Best Reheat Method |
|---|---|---|---|
| Fried chicken (cooked) | 3-4 days | Up to 3 months | Air fryer at 375°F / 190°C for 8-10 min (best for crispness) |
| Fried chicken (cooked) | 3-4 days | Up to 3 months | Oven at 400°F / 204°C on a wire rack for 12-15 min |
| Breaded chicken (uncooked) | Up to 24 hours | Up to 2 months | Fry straight from fridge at 350°F / 177°C |
Never microwave fried chicken—it turns the coating rubbery and destroys the texture.
Frequently Asked Questions
Can I use cornstarch instead of flour?
You can, but do not replace all the flour. Cornstarch creates an incredibly crispy crust, but it does not have the gluten structure flour provides. Use a mix: 75% flour, 25% cornstarch. Pure cornstarch coatings can shatter and fall off in large pieces.
Does double-dipping make the coating stick better?
Yes, but only if done correctly. After the first dredge, dip the chicken back in buttermilk, then dredge again. This creates a thicker coating with more surface area to bond. Just make sure to let it rest for 20 minutes after the second dredge, or the extra weight will cause it to slide off.
Why does my coating stick at first but fall off after a few minutes?
This is a classic sign of oil that is too cool. The coating never fully set, so it absorbed oil and became fragile. When you move the chicken or flip it, the greasy, weak crust tears away. Always verify oil temp with a thermometer, not a guess.
Can I bake instead of fry and still keep the coating?
Absolutely. Coat the chicken as directed, then bake on a wire rack at 425°F / 218°C for 35-45 minutes. The rack allows air circulation, which mimics frying. Spray the coating lightly with oil halfway through to boost crispness.
What if I am using boneless chicken?
Boneless pieces have less connective tissue and collagen, so they release more moisture during cooking. Pound them to even thickness, brine for 30 minutes, then dry obsessively. Consider adding 1 tablespoon of mayonnaise to your buttermilk mixture—it adds fat and helps the coating cling.
Chef John’s Insight
Fried chicken taught me that perfection is not about speed. It is about respect for process. Every time I rush the dry-down or skip the rest period, the chicken reminds me. The coating slips. The crust fails. And I am humbled again. But when I slow down, when I honor each small step, the transformation is flawless. The buttermilk bonds to the meat. The flour hydrates into a shell. The heat locks it all in place. And what emerges is not just food—it is proof that patience and precision always win. The quiet steps are the powerful ones.
— Chef John
4 Reasons Your Chicken Coating Falls Off (Stop Doing This!)
Ingredients
Equipment
Method
- Pat the chicken pieces completely dry with paper towels. Reason: Surface moisture creates a steam barrier that pushes the coating away.
- Submerge chicken in buttermilk and hot sauce for 4–24 hours.
- Dredge chicken in the flour/cornstarch mix. Chef’s Secret: Press the flour firmly into the meat with your palm to create a physical bond.
- Place breaded chicken on a wire rack for 15 minutes. Reason: This allows the flour to hydrate and “glue” itself to the chicken skin.
- Heat oil in a Lodge Cast Iron skillet to 350°F (177°C). Fry in batches until internal temp reaches 165°F (74°C).
Notes
1. The “Air-Chilled” Advantage 🍗
In the USA, most chicken in grocery stores like Walmart or Kroger is water-chilled. This means the chicken absorbs up to 12% of its weight in water. When you fry it, that water turns into steam, which is the #1 reason the coating slides off. If your budget allows, buy “Air-Chilled” chicken (available at Whole Foods or Trader Joe’s). It’s drier and holds the breading much better.2. Flour vs. Cornstarch Ratio 🧪
Using 100% All-Purpose flour often leads to a “bready” or chewy crust. I recommend a 4:1 ratio (4 parts flour to 1 part cornstarch). Cornstarch weakens the gluten development, resulting in a more brittle, “shatter-crisp” texture that stays attached to the skin.3. The 15-Minute “Glue” Phase ⏳
This is the most skipped step in American kitchens. After dredging, let the chicken rest on a wire rack for 15 minutes. During this time, the moisture from the buttermilk hydrates the flour, turning it into a “glue” that chemically bonds to the protein. If you fry immediately, the dry flour will just float away in the oil.4. Oil Temperature Management 🌡️
Do not trust your stove dial; trust an infrared or clip-on thermometer. You want the oil at 350°F (177°C).- Too Low: The coating absorbs oil and becomes heavy, sliding off.
- Too High: The outside burns before the “glue layer” can set, causing the crust to separate.
5. Proper Draining Technique 🗄️
Never drain fried chicken on paper towels. The steam trapped between the hot chicken and the paper towel creates “sweat,” which turns your hard-earned crust into a soggy mess. Always use a wire cooling rack over a baking sheet. This allows air to circulate 360° around the piece.6. The “Double-Dredge” Warning ⚠️
While “double-dipping” (Buttermilk → Flour → Buttermilk → Flour) creates a thicker crust, it also makes it much heavier. If you haven’t mastered the Press and Rest technique, a double-dredge is more likely to fall off. Stick to a single, well-pressed layer for the best results.Nutrition Information (Per Serving, Estimated)
| Nutrient | Amount |
|---|---|
| Calories | 480 kcal |
| Protein | 32 g |
| Total Fat | 28 g |
| Saturated Fat | 6 g |
| Carbohydrates | 22 g |
| Sodium | 720 mg |
| Cholesterol | 145 mg |
Based on 6 servings. Actual values vary by piece size and frying time.
Food Safety Temperature Guide
| Stage | Temperature | Why It Matters |
|---|---|---|
| USDA Safe Minimum (Chicken) | 165°F / 74°C | Kills harmful bacteria like Salmonella. Non-negotiable. |
| Danger Zone (Do Not Hold Here) | 40°F – 140°F / 4°C – 60°C | Bacteria multiply rapidly in this range. Keep chicken cold or hot. |
| Ideal Frying Oil Temperature | 350°F / 177°C | Coating sets immediately without burning. Maintains crispness. |
| Resting Internal Temp (Carryover) | 160°F / 71°C (pulls at this temp) | Chicken will coast to 165°F / 74°C while resting. Prevents dryness. |
USDA safety standards ya Safe internal temperature
Storage & Reheating Guide
| State | Refrigerator | Freezer | Best Reheat Method |
|---|---|---|---|
| Fried chicken (cooked) | 3-4 days | Up to 3 months | Air fryer at 375°F / 190°C for 8-10 min (best for crispness) |
| Fried chicken (cooked) | 3-4 days | Up to 3 months | Oven at 400°F / 204°C on a wire rack for 12-15 min |
| Breaded chicken (uncooked) | Up to 24 hours | Up to 2 months | Fry straight from fridge at 350°F / 177°C |
Never microwave fried chicken—it turns the coating rubbery and destroys the texture.
Frequently Asked Questions
Can I use cornstarch instead of flour?
You can, but do not replace all the flour. Cornstarch creates an incredibly crispy crust, but it does not have the gluten structure flour provides. Use a mix: 75% flour, 25% cornstarch. Pure cornstarch coatings can shatter and fall off in large pieces.
Does double-dipping make the coating stick better?
Yes, but only if done correctly. After the first dredge, dip the chicken back in buttermilk, then dredge again. This creates a thicker coating with more surface area to bond. Just make sure to let it rest for 20 minutes after the second dredge, or the extra weight will cause it to slide off.
Why does my coating stick at first but fall off after a few minutes?
This is a classic sign of oil that is too cool. The coating never fully set, so it absorbed oil and became fragile. When you move the chicken or flip it, the greasy, weak crust tears away. Always verify oil temp with a thermometer, not a guess.
Can I bake instead of fry and still keep the coating?
Absolutely. Coat the chicken as directed, then bake on a wire rack at 425°F / 218°C for 35-45 minutes. The rack allows air circulation, which mimics frying. Spray the coating lightly with oil halfway through to boost crispness.
What if I am using boneless chicken?
Boneless pieces have less connective tissue and collagen, so they release more moisture during cooking. Pound them to even thickness, brine for 30 minutes, then dry obsessively. Consider adding 1 tablespoon of mayonnaise to your buttermilk mixture—it adds fat and helps the coating cling.You Might Also Love These Recipes
You Might Also Love These Recipes
If this guide helped you master the science of coating adhesion, you will want to check out these other deep dives on The Flavor Bazaar: