Best Breakfast Sushi Rolls Recipe for Kids
By Chef John | Easy Recipes & Smart Cooking Hacks
The Morning Chaos Nobody Talks About
You know that moment when your kid pushes away the same scrambled eggs they loved last week, and you are standing there at 7:15 AM with seventeen minutes until the bus arrives? I have been there more times than I care to admit. Standard breakfast foods fall into a predictable rut—toast, cereal, oatmeal on repeat—until even the most easygoing child starts the negotiations.and Breakfast Sushi Rolls
That is when I started experimenting with something completely different: kid-friendly breakfast rolls that look like sushi but taste like morning comfort food wrapped in pure fun. I have tested this method across dozens of batches, adjusting the structural integrity of the roll to ensure it holds up perfectly in little hands without falling apart. The result is not just a gimmick. It is a genuinely effective way to pack protein, fruit, and whole grains into a format that kids actually get excited about eating.
This is not about tricking anyone. It is about meeting young eaters where their curiosity lives.
The Science Behind Breakfast Sushi That Actually Holds Together
Here is what most parents do not realize: the reason your fun morning sushi falls apart is not bad luck—it is structural physics. When you roll soft ingredients inside a pliable matrix, you are dealing with competing forces. The bread or wrap needs enough surface tension to create cohesion, but if it is too dry, it cracks. If it is too moist, it tears.
The secret lies in understanding polysaccharide adhesion. Bread contains complex carbohydrates that, when gently compressed with a rolling pin, create a tighter gluten network. Add a thin layer of a sticky binding agent—nut butter, cream cheese, or mashed banana—and you introduce natural proteins and fats that act like edible glue. The moisture from fresh fruit wants to escape, but when controlled by proper layering, surface tension keeps everything contained.
In simple terms: you are creating a sealed environment where starches stick to proteins, and both hold onto your fillings through mechanical pressure and natural adhesion.
Polysaccharide Adhesion+Surface Tension→Structural Integrity
The rolling technique matters just as much as the ingredients. Apply even pressure from the center outward, and you distribute the filling uniformly without creating weak spots. Think of it like engineering a tiny edible cylinder where every layer supports the next.
Pro Buying Guide: What to Get and Where to Find It (USA)
If you want this recipe to work without frustration, ingredient quality matters. Here is what I reach for every single time, and where I find it.
Bread Base: Look for Nature’s Own Honey Wheat or Sara Lee Soft & Smooth White at any Walmart or Target. You want sandwich bread that is soft enough to flatten but has enough structure to roll. Avoid artisan breads—they are too dense and will crack.
Binding Spreads: Jif Creamy Peanut Butter (widely available) or if you are dealing with nut allergies, grab SunButter Organic Sunflower Butter from Whole Foods or Trader Joe’s. For a sweeter option, Nutella works beautifully. Cream cheese (Philadelphia Original) is another excellent choice, especially when mixed with a teaspoon of honey.
Fresh Fruit: Trader Joe’s has consistently firm strawberries and organic blueberries. Whole Foods carries perfectly ripe bananas that are not overly mushy. You want fruit that holds its shape when sliced thin—watery or overripe fruit will bleed moisture and make your rolls soggy.
Optional Toppings: Sprinkle on some Bob’s Red Mill unsweetened shredded coconut (Target, Kroger) or mini chocolate chips from Enjoy Life Foods if you want allergy-friendly options.
Avoid pre-sliced fruit cups. They are packed in syrup or juice that will sabotage your structural integrity within minutes.
Ingredients Table
| Ingredient | US Customary | Metric |
|---|---|---|
| Base | ||
| Soft sandwich bread slices | 6 slices | 6 slices |
| Binding Spread | ||
| Peanut butter or SunButter | 1/2 cup | 120g |
| Cream cheese (optional swap) | 1/2 cup | 120g |
| Honey | 1 tbsp | 15ml |
| Fillings | ||
| Fresh strawberries, sliced thin | 1 cup | 150g |
| Banana, sliced lengthwise | 1 medium | 120g |
| Fresh blueberries | 1/2 cup | 75g |
| Toppings (Optional) | ||
| Shredded coconut (unsweetened) | 2 tbsp | 10g |
| Mini chocolate chips | 2 tbsp | 20g |
| Granola crumble | 2 tbsp | 15g |
Common Mistakes Table
| The Mistake | What Actually Happens | The Fix |
|---|---|---|
| Using thick-sliced artisan bread | Bread cracks when rolled; creates structural failure | Use soft sandwich bread only |
| Spreading filling too thick | Roll becomes too bulky; ends pop open | Use thin, even layer (about 1/8 inch / 3mm) |
| Not flattening the bread first | Air pockets form; roll is loose and falls apart | Gently roll with a rolling pin before assembly |
| Using overripe or watery fruit | Excess moisture soaks into bread; causes soggy breakdown | Choose firm fruit; pat dry with paper towel |
| Rolling too loosely | Pieces slide apart when sliced | Apply steady, even pressure while rolling |
| Cutting with a dull knife | Bread compresses and filling squishes out the sides | Use a sharp serrated knife with gentle sawing motion |
Step-by-Step Method
Step 1: Prepping the Structural Canvas
Start by trimming the crusts off each slice of bread with a sharp knife. This is not just about aesthetics—crust creates a rigid edge that resists rolling and can cause cracking. Once trimmed, place each slice on a clean cutting board and gently flatten it with a rolling pin. Use light, even strokes from the center outward. You will notice the bread becomes slightly thinner and more pliable. This step compresses the gluten network and removes excess air, which is critical for creating a tight roll that will not unravel.
If you are working with kids, this is a great tactile step they can help with. Just remind them: gentle pressure, not pancake-flattening force.
Step 2: Building the Binding Layer
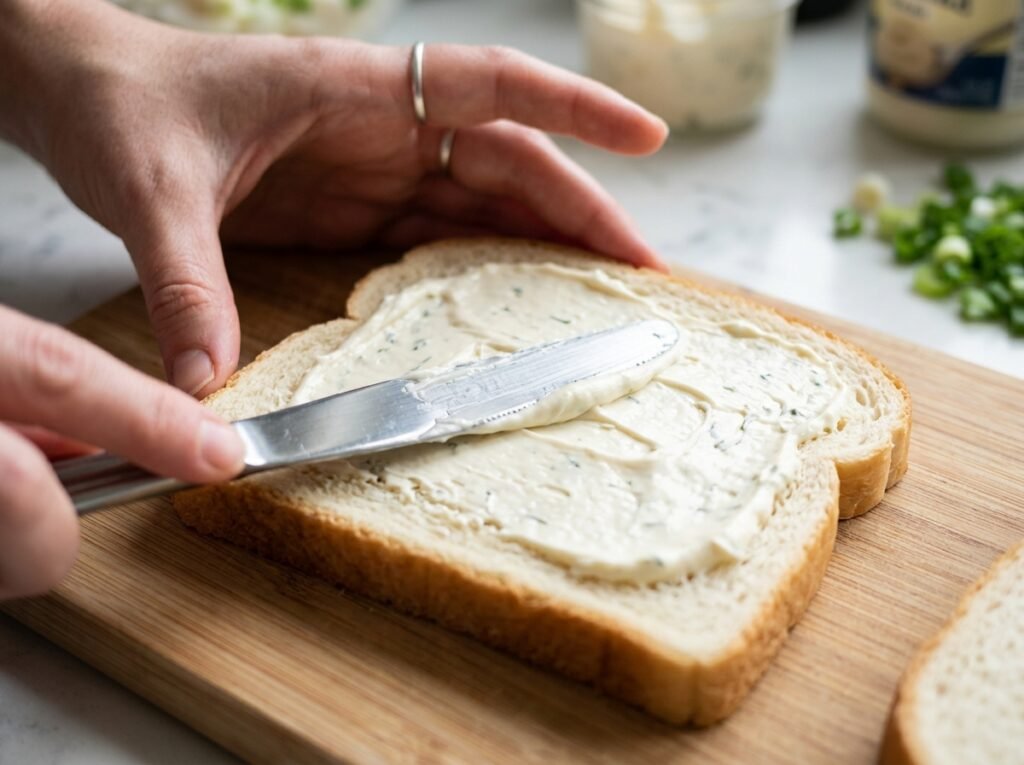
Spread your chosen binding agent across the flattened bread in a thin, even layer. I use the back of a spoon and aim for about one-eighth of an inch of coverage, leaving a small border on one edge—this will be your sealing edge. If you are using peanut butter or SunButter, the natural oils create excellent adhesion. Cream cheese works similarly but benefits from a tiny drizzle of honey mixed in for sweetness and a bit of extra stickiness.
The science here is simple: fats and proteins in the spread create a moisture barrier that keeps fruit juice from soaking into the bread while also acting as edible glue when the roll is compressed.
Step 3: Layering the Fruit Fillings
Place your fruit in a single horizontal line about one inch from the bottom edge of the bread. If you are using banana, lay thin lengthwise slices end-to-end. For strawberries, arrange thin slices slightly overlapping. Blueberries can be pressed gently into the spread to keep them from rolling away.
Avoid the temptation to overfill. One of the most common structural failures happens when parents pack too much fruit into the center. The roll cannot contain the volume, and it bursts when you try to slice it. Think minimalist—you want a visible ribbon of color, not a fruit salad wrapped in bread.
Step 4: The Rolling Technique
This is where structural integrity is won or lost. Starting from the fruit-filled edge, begin rolling the bread tightly over the filling. Use your fingers to apply even pressure across the entire width of the roll as you go. The goal is to eliminate air pockets and create uniform tension from end to end.
When you reach the opposite edge—the one without filling—press it gently into the roll to seal. The moisture from the spread will naturally adhere the seam closed. Let the finished roll rest seam-side down for about thirty seconds. This allows the adhesion to set.

Step 5: Slicing the Sushi Pieces
Use a sharp serrated knife and a gentle sawing motion. Do not press down—let the blade do the work. Slice each roll into four to six equal pieces, depending on the size you want. Wipe the blade between cuts to prevent sticking and compression.
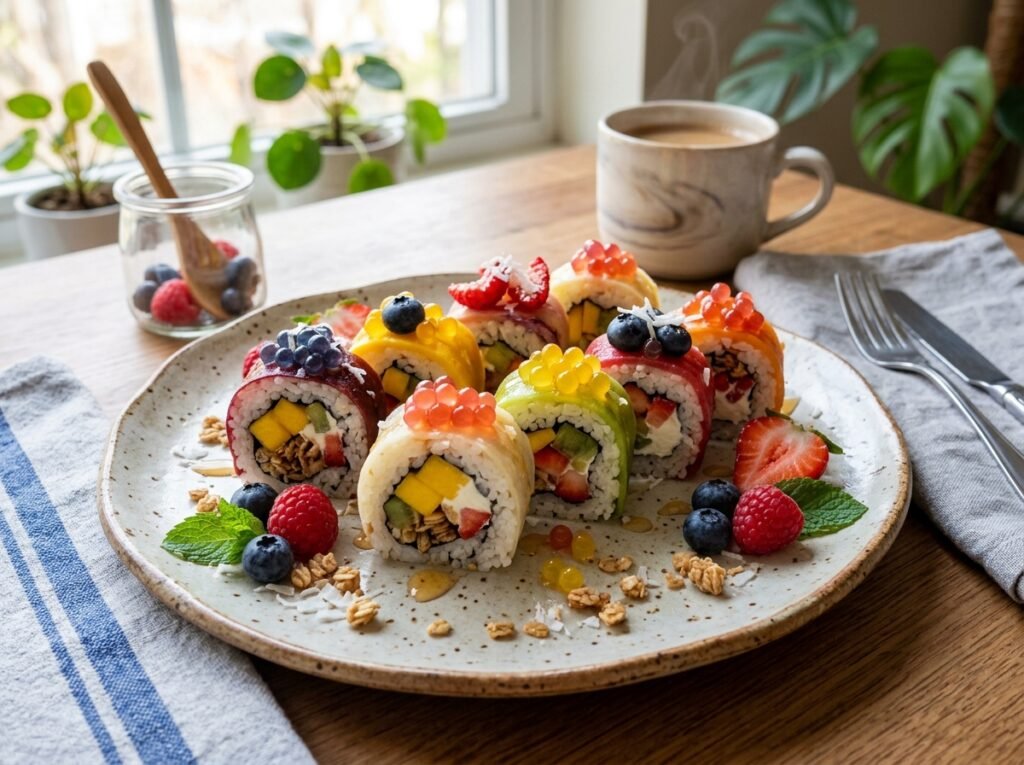
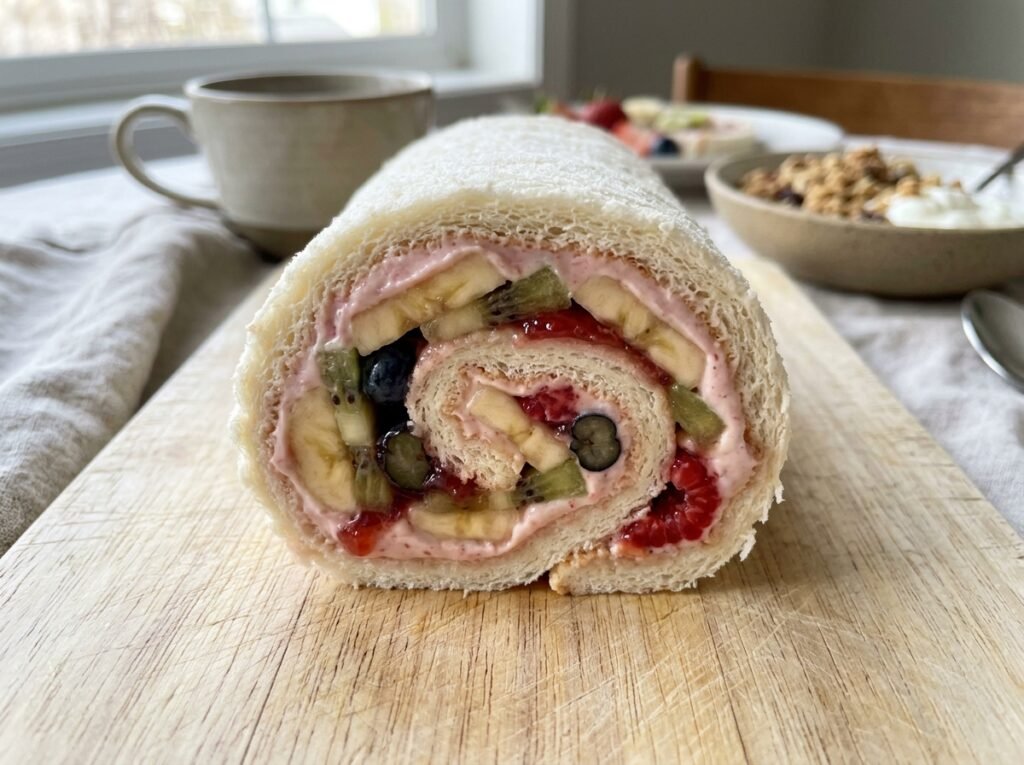
Arrange the pieces cut-side up on a plate. The cross-section should reveal distinct layers: bread, spread, and a colorful stripe of fruit. If any pieces lose their shape, it is usually because the roll was too loose or the knife was dull.

Pro Tip: The Dipping Sauce Station
Turn breakfast into an interactive experience by setting up a small “dipping station” with Greek yogurt mixed with a drizzle of honey or a small bowl of Nutella. Kids love the autonomy of dipping their own pieces, and it adds an extra layer of protein and calcium. Use small condiment bowls from Target (their Pillowfort line has great kid-friendly options) and let them choose their own adventure. This single move can increase engagement and actual consumption significantly.

Best Breakfast Sushi Rolls Recipe for Kids
Ingredients
Equipment
Method
- Place the soft sandwich bread slices on a clean cutting board and use a rolling pin to press them completely flat.
- Spread an even layer of creamy peanut butter across the entire surface of the flattened bread slices.
- Layer the vanilla Greek yogurt directly over the peanut butter to act as a smooth, creamy adhesive.
- Place a peeled, straight banana on one edge of the bread slice and sprinkle the finely diced strawberries next to it.
- Roll the bread tightly around the banana core, applying gentle pressure to ensure structural integrity.
- Use a sharp chef knife to slice the rolled log into even, bite-sized sushi pieces.
- Arrange the rolls on a plate, drizzle with natural honey, and top with rainbow sprinkles.
Notes
Chef John’s Insight
There is something deeply satisfying about watching a child pick up food they helped create and eat it without negotiation. Breakfast sushi is not about culinary trickery—it is about honoring the fact that kids are visual, tactile learners who engage more deeply with food that looks different, feels hands-on, and invites curiosity. I have watched skeptical parents try this once and then add it to their weekly rotation, not because it is complicated, but because it works. The rolling, the slicing, the arranging—it turns breakfast prep into a shared ritual instead of a battle. And that shift, from obligation to collaboration, is where real food confidence begins. The kitchen is not a place to enforce rules—it is a place to build trust, one small roll at a time.
— Chef John
Nutrition Table (Per Serving – 1 Roll / 4–6 Pieces)
| Nutrient | Amount |
|---|---|
| Calories | 210 kcal |
| Protein | 6g |
| Total Fat | 9g |
| Saturated Fat | 2g |
| Carbohydrates | 28g |
| Sodium | 180mg |
| Cholesterol | 5mg |
Note: Nutritional values are estimates and will vary based on specific brands and portion sizes. Values are based on peanut butter and mixed fruit fillings.
Food Safety & Health Temperature Guide
While these fruity breakfast sushi rolls do not require cooking, food safety is still critical when preparing meals for children.
Key Safety Temperatures:
- Danger Zone: 40°F–140°F (4°C–60°C) — Keep perishable spreads (cream cheese, yogurt-based dips) refrigerated until use.
- Cold Storage: Store assembled rolls at or below 40°F (4°C) if preparing ahead.
- Fruit Washing: Rinse all fresh berries and fruits under cool running water for at least 20 seconds before slicing.
Allergy Awareness:
If your child has a nut allergy, substitute peanut butter with SunButter (sunflower seed butter) or Wow Butter (soy-based). Both are widely available at Target, Whole Foods, and Walmart. Always check labels for cross-contamination warnings if allergies are severe.
Storage & Reheating Table
| State | Fridge | Freezer | Best Practice |
|---|---|---|---|
| Assembled rolls (unsliced) | 24 hours in airtight container | Not recommended | Wrap tightly in plastic wrap; store flat |
| Sliced sushi pieces | 4–6 hours (best fresh) | Not recommended | Arrange in single layer; cover with damp towel |
| Lunchbox transport (unrefrigerated) | N/A | N/A | Include ice pack; consume within 3 hours |
Pro Tip: If making the night before, store the rolls whole and slice them fresh in the morning. This preserves texture and prevents the cut edges from drying out.
FAQ Section
Can I make these the night before?
Yes, but with a caveat. Assemble the rolls fully, wrap them tightly in plastic wrap, and refrigerate. Slice them fresh in the morning to maintain the best texture. Banana-based rolls should be made the same day to prevent browning.
How do I stop bananas from browning?
Lightly brush banana slices with lemon juice or orange juice before assembly. The citric acid slows oxidation without altering the flavor significantly. Alternatively, use firmer fruits like strawberries or mango for overnight prep.
What if my child has a nut allergy?
Swap peanut butter for SunButter (sunflower seed butter) or cream cheese mixed with honey. Both provide the structural adhesion you need without allergen risk. Always verify labels for cross-contamination warnings.
Can I use whole wheat or gluten-free bread?
Whole wheat works well as long as it is soft sandwich-style bread. Gluten-free bread can be trickier—it tends to be drier and more fragile. If using gluten-free, add extra spread and roll very gently to avoid cracking.
What is the best way to pack these for school lunch?
Use a bento-style lunchbox with separate compartments. Place the sushi pieces in one section with a small ice pack underneath. Add a tiny container of yogurt or Nutella for dipping. They hold up well for 3–4 hours when kept cool.
Internal Linking Suggestions
[Easy Mexican Street Corn Salad Recipe]
[Easy Crispy Honey Garlic Chicken Bites Recipe]