Best Spicy Chipotle Ranch Chicken Wrap Recipe
By Chef John | “Easy Recipes & Smart Cooking Hacks”
You fold back the warm tortilla edge and take that first ambitious bite. The crisp lettuce crunches against your teeth, followed immediately by the smoky heat of chipotle mingling with cool, creamy ranch. Then you feel it—that telltale drip running down your wrist. Within seconds, the entire back half of your spicy chipotle ranch chicken wrap has split open, dumping seasoned chicken and watery sauce all over your plate. It is one of the most frustrating failures in quick lunch cooking, and it happens because most people build their wraps in completely the wrong order.
I have tested this method across dozens of batches, adjusting one variable at a time to isolate exactly what makes the difference. The secret is not better folding technique or expensive tortillas. It is understanding moisture control and strategic layering. When you place wet ingredients directly against the tortilla surface, you are creating a ticking time bomb. But when you build intelligent barriers using fat-based sauces and dry greens, you end up with a handheld masterpiece that stays structurally sound from the first bite to the last.
The Science Behind a Structurally Perfect Wrap
The primary reason wraps fall apart has everything to do with how water molecules interact with flour-based starches. Fresh vegetables like tomatoes and lettuce contain enormous amounts of free water sitting on their surface. When that moisture contacts the porous surface of a flour tortilla, the starch granules absorb it immediately, weakening the gluten network that gives the wrap its strength and flexibility.
To prevent this structural collapse, we rely on emulsified fat barriers. An emulsion is a stable mixture of two liquids that normally would not combine—in this case, oil and water. When you whisk mayonnaise together with buttermilk and add minced chipotle peppers, you are creating millions of tiny oil droplets suspended in a dairy matrix.
Oil Droplets+Dairy Emulsifiers→Stable Moisture Barrier
In simple terms: the fat molecules in your ranch dressing form a protective shield that water cannot easily penetrate. When you spread this emulsified sauce directly onto the tortilla surface before adding wet ingredients, you are creating a hydrophobic barrier that keeps moisture away from the flour.
The chipotle peppers add more than just heat. The capsaicin compounds in chipotles are oil-soluble, meaning they bind to the fat molecules in the ranch dressing. This creates a uniform distribution of spice throughout the sauce, rather than isolated pockets of intense heat. The dairy proteins in buttermilk also help temper the capsaicin burn by binding to the same tongue receptors, giving you controlled warmth instead of overwhelming fire.
Pro Buying Guide: Essential USA Ingredients and Tools
Walking into your local grocery store with a precise shopping list transforms this recipe from good to exceptional. Here is exactly what you need and where to find it.
Tortilla Selection
Head to Walmart or Kroger and grab Mission Burrito Size Flour Tortillas or Guerrero Riquisimas Flour Tortillas. These brands have the perfect balance of gluten strength and pliability. Avoid whole wheat versions for this recipe—they lack the elasticity needed to handle heavy fillings without tearing.
Building the Perfect Sauce
For the ranch base, pick up Hidden Valley Ranch Seasoning Mix from Target or make it from scratch using real mayonnaise. I recommend Duke’s Mayonnaise or Hellmann’s Real Mayonnaise—never use “sandwich spread” or low-fat versions, as they lack the fat content needed for proper emulsification.
The star ingredient is La Costeña Chipotle Peppers in Adobo Sauce, available in the international aisle at most supermarkets. Trader Joe’s also carries their own excellent version. The adobo sauce contains tomato paste, vinegar, and spices that add tremendous depth beyond just heat.
Chicken Preparation
For the protein, look for Perdue Boneless Skinless Chicken Breasts at Whole Foods or Kroger. If you want to save time, grab a rotisserie chicken from the deli section—just remove the skin and shred the breast meat.
Equipment That Matters
A good cast iron skillet or nonstick griddle pan is essential for getting a proper sear on your chicken and for toasting the final assembled wrap. I recommend the Lodge 12-inch Cast Iron Skillet available at Target or Amazon.
📐 Ingredients Table
| Category | Ingredient | US Customary | Metric |
|---|---|---|---|
| Protein | Boneless, skinless chicken breasts | 1 lb | 450g |
| Wrap Base | Large burrito-size flour tortillas | 4 tortillas | 4 tortillas |
| Sauce | Real mayonnaise | ½ cup | 120ml |
| Sauce | Buttermilk | ¼ cup | 60ml |
| Sauce | Chipotle peppers in adobo (minced) | 2-3 peppers | 2-3 peppers |
| Sauce | Adobo sauce from can | 1 tbsp | 15ml |
| Sauce | Garlic powder | ½ tsp | 2g |
| Sauce | Onion powder | ½ tsp | 2g |
| Wrap Build | Romaine lettuce (shredded, dried) | 2 cups | 110g |
| Wrap Build | Roma tomatoes (seeded, diced) | 2 medium | 200g |
| Wrap Build | Sharp cheddar cheese (shredded) | 1 cup | 115g |
| Seasoning | Smoked paprika | 1 tsp | 3g |
| Seasoning | Kosher salt | 1 tsp | 6g |
| Seasoning | Black pepper | ½ tsp | 1g |
| Cooking | Olive oil or vegetable oil | 2 tbsp | 30ml |
⚠️ Common Mistakes That Ruin Your Wrap
| The Mistake | What Actually Happens | The Fix |
|---|---|---|
| Using cold tortillas straight from the package | The starches are rigid and brittle, causing immediate cracking when you fold | Warm each tortilla in a dry skillet for 10-15 seconds per side to activate gluten flexibility |
| Leaving tomato seeds and gel inside | The watery seed gel continuously leaks moisture, creating a soggy mess within minutes | Slice tomatoes, scoop out all seeds and gel, and dice only the firm outer walls |
| Not drying the lettuce after washing | Water clinging to lettuce leaves dilutes the sauce and soaks into the tortilla | Use a salad spinner and pat lettuce completely dry with paper towels |
| Adding piping hot chicken directly to the wrap | Steam from hot chicken condenses inside the wrap, creating moisture that weakens the tortilla | Let cooked chicken rest for 3-4 minutes to cool slightly before assembly |
| Overfilling the center | Too much filling exceeds the structural capacity of the tortilla, preventing a tight roll | Use no more than ⅔ cup total filling per wrap, concentrated in a 3-inch strip |
| Skipping the final sear | Un-toasted wraps have loose seams that unroll easily and lack textural contrast | Place assembled wrap seam-side down in a hot skillet for 30-45 seconds to seal |
🍳 Step-by-Step Cooking Method
Seasoning and Searing the Chicken
Start by slicing your chicken breasts into uniform strips about half an inch thick. This ensures even cooking and creates perfectly sized pieces for wrapping. In a medium bowl, toss the chicken strips with kosher salt, smoked paprika, and black pepper until every piece is evenly coated.
Heat two tablespoons of oil in your cast iron skillet over medium-high heat until it shimmers. Lay the seasoned chicken strips in a single layer, making sure not to crowd the pan. Let them cook undisturbed for three to four minutes until a golden-brown crust develops on the bottom surface.
Flip each strip and cook for another three to four minutes until the internal temperature reaches 165°F (74°C) on an instant-read thermometer. Transfer the chicken to a clean plate and let it rest while you prepare the other components.

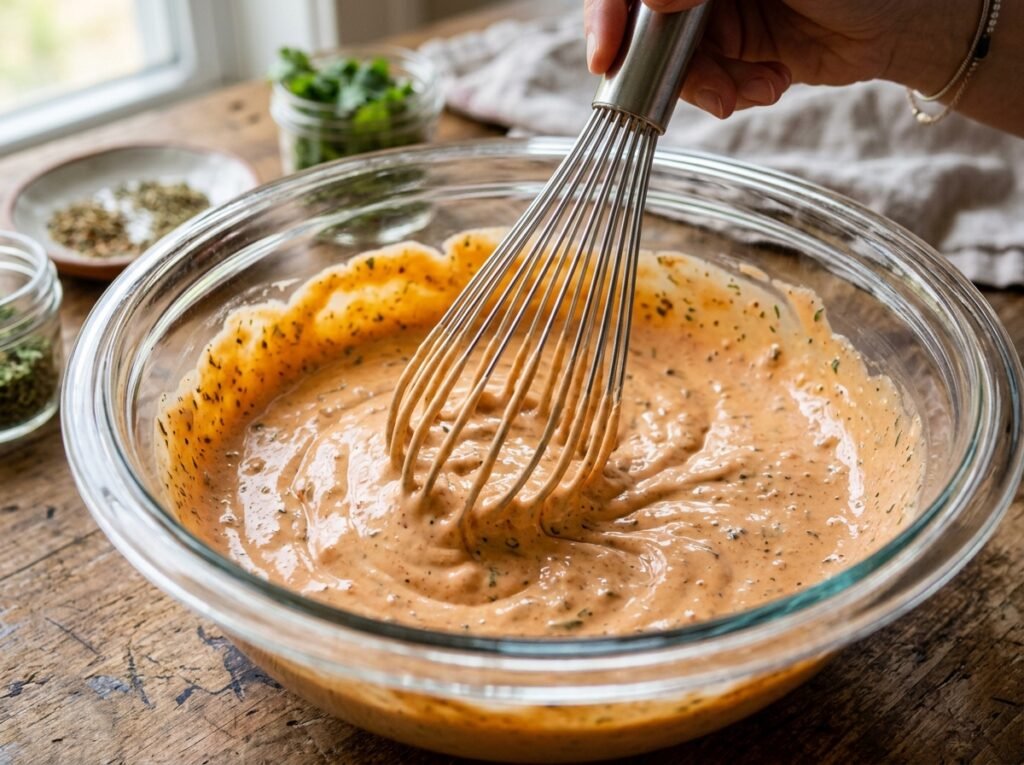
Creating the Emulsified Chipotle Ranch
In a small mixing bowl, combine the mayonnaise and buttermilk. Finely mince two to three chipotle peppers from the can, making sure to scrape off some of the thick adobo sauce clinging to them. Add the minced chipotles, one tablespoon of adobo sauce, garlic powder, and onion powder to the bowl.
Whisk everything together vigorously for about thirty seconds until the mixture turns a uniform coral color and the sauce thickens noticeably. The emulsion should be thick enough to coat the back of a spoon without running off immediately. Taste and adjust the heat level by adding more chipotle or adobo sauce if you prefer extra spice.
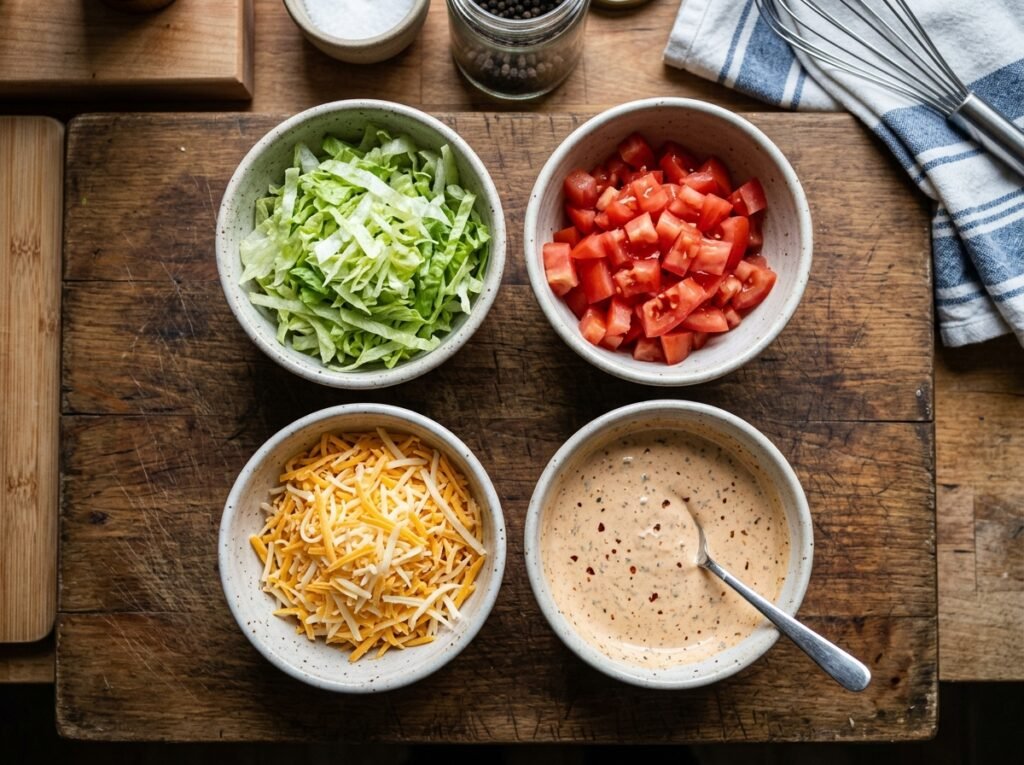
Preparing Your Vegetables
Slice your Roma tomatoes in half lengthwise and use a small spoon to scoop out all the seeds and watery gel from the interior chambers. Dice only the firm outer walls into quarter-inch pieces. This step alone will prevent ninety percent of wrap sogginess issues.
Shred your romaine lettuce into thin ribbons and run it through a salad spinner. Then spread the lettuce on a clean kitchen towel and pat it thoroughly dry. Any residual water on the greens will compromise your moisture barrier.
Activating the Tortilla Starch
Place a clean, dry skillet over medium heat. Lay one tortilla flat in the pan without any oil or butter. Let it warm for ten to fifteen seconds until you see small bubbles forming and the tortilla becomes noticeably more pliable.
Flip it over and warm the second side for another ten seconds. This gentle heating relaxes the gluten network and makes the starches more flexible, dramatically reducing the chance of cracking during rolling. Remove the tortilla to your work surface and repeat with the remaining tortillas.
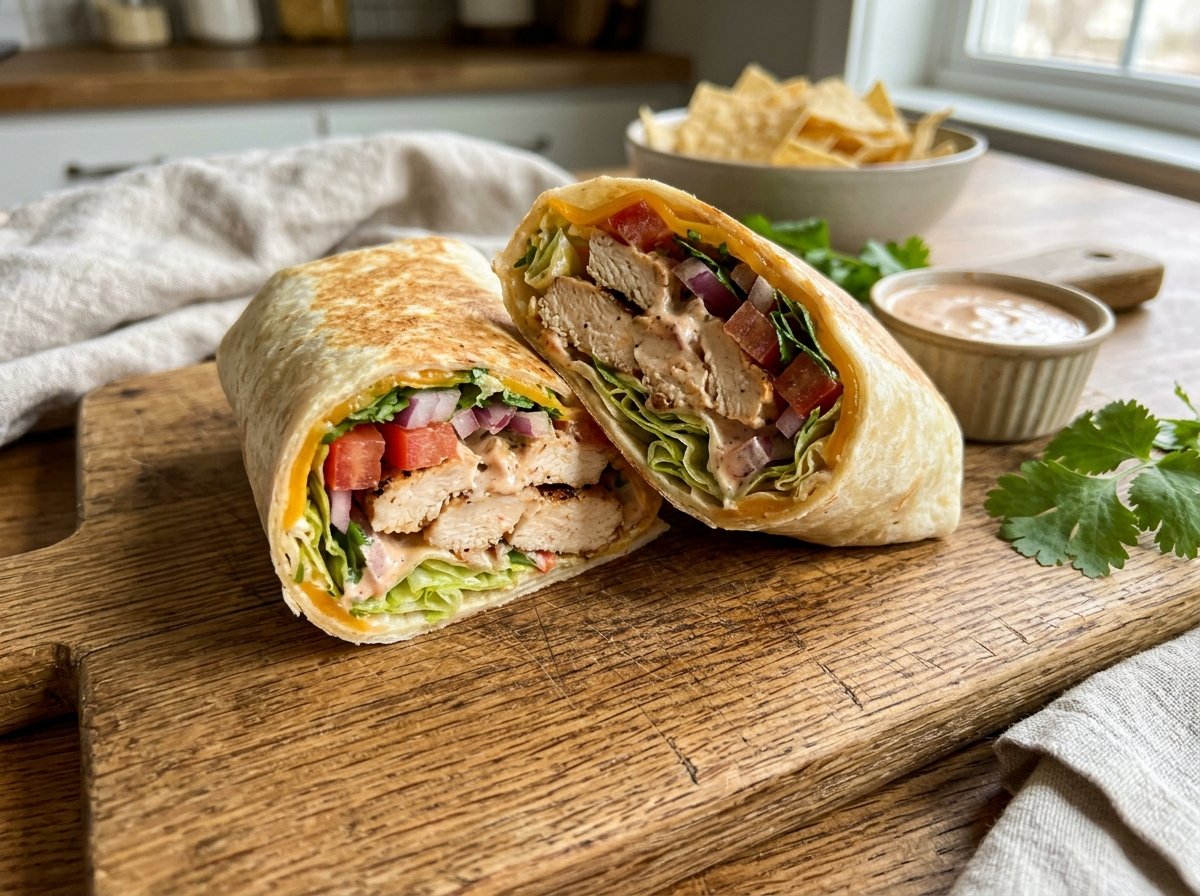
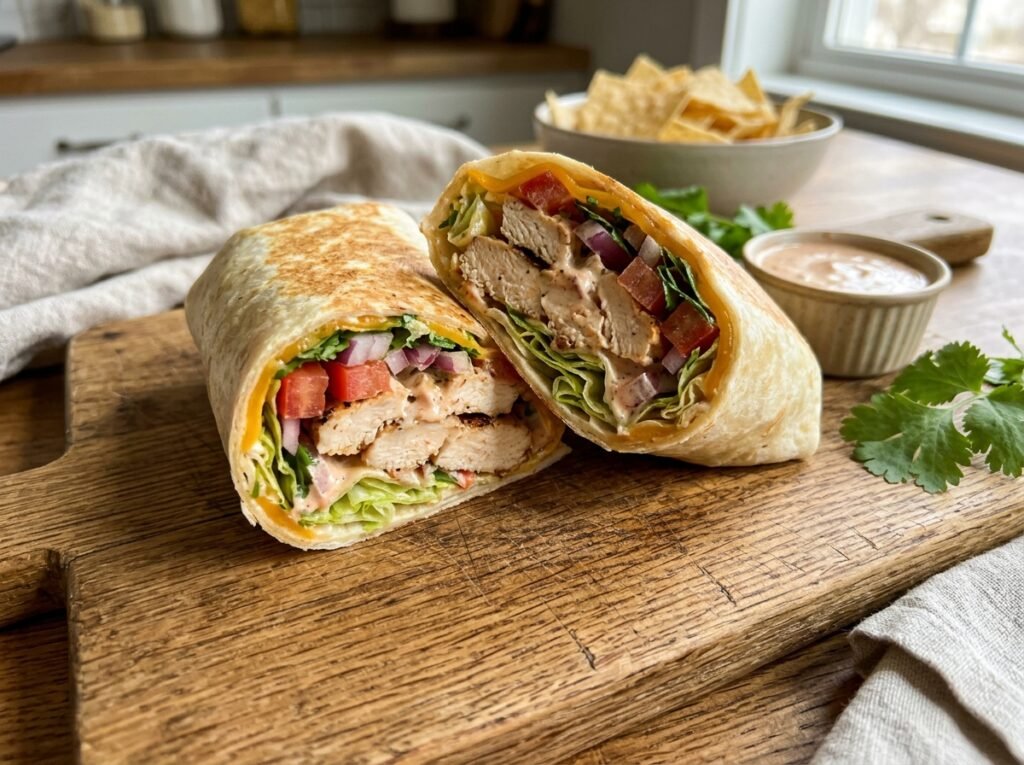
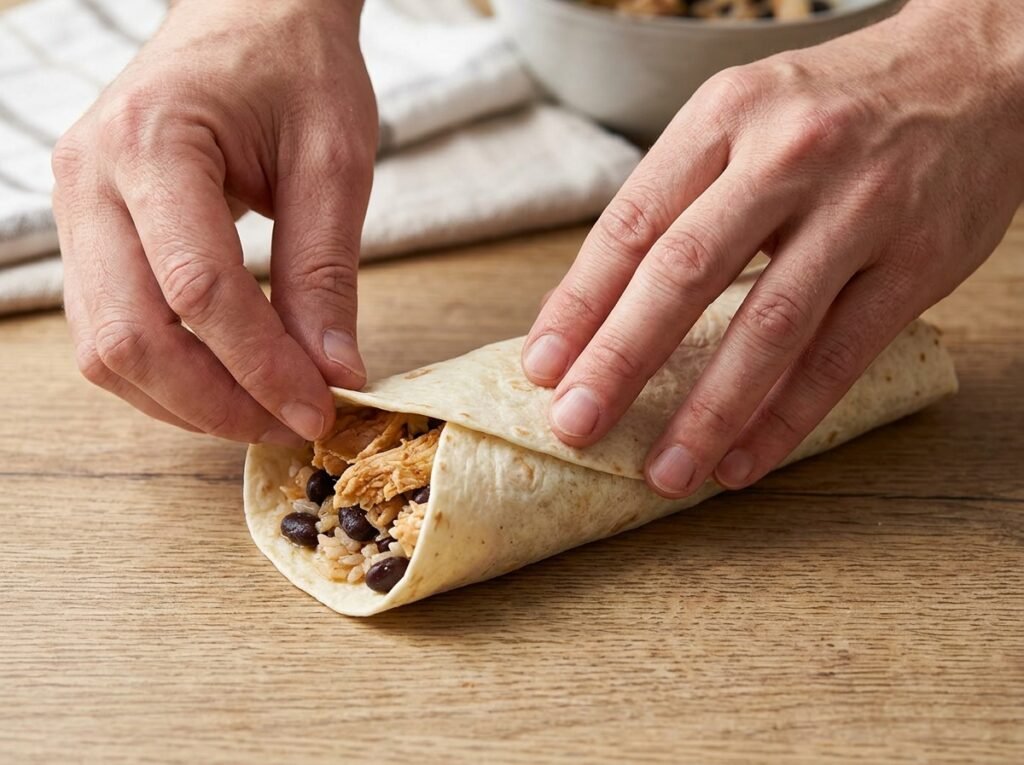
Strategic Assembly and Layering
Lay a warmed tortilla flat on a clean cutting board. Spread three tablespoons of chipotle ranch sauce across the lower third of the tortilla, leaving a one-inch border clean along the bottom edge. This fat-based sauce layer is your primary moisture barrier.
Place a generous handful of the dried lettuce directly on top of the sauce. The lettuce creates a physical shield between the sauce barrier and the wetter ingredients that will go on top. Arrange four to five chicken strips across the lettuce bed, then sprinkle on the diced tomatoes and shredded cheddar cheese.
The Professional Rolling Technique
Fold the left and right sides of the tortilla inward by about two inches, creating parallel edges. Grasp the bottom edge closest to you and pull it up and over the filling, tucking it tightly underneath the ingredients.
Roll forward with steady pressure, maintaining tension by pulling back slightly as you roll. This creates compression that holds everything together. Continue rolling until you have a tight cylinder with the seam on the bottom.
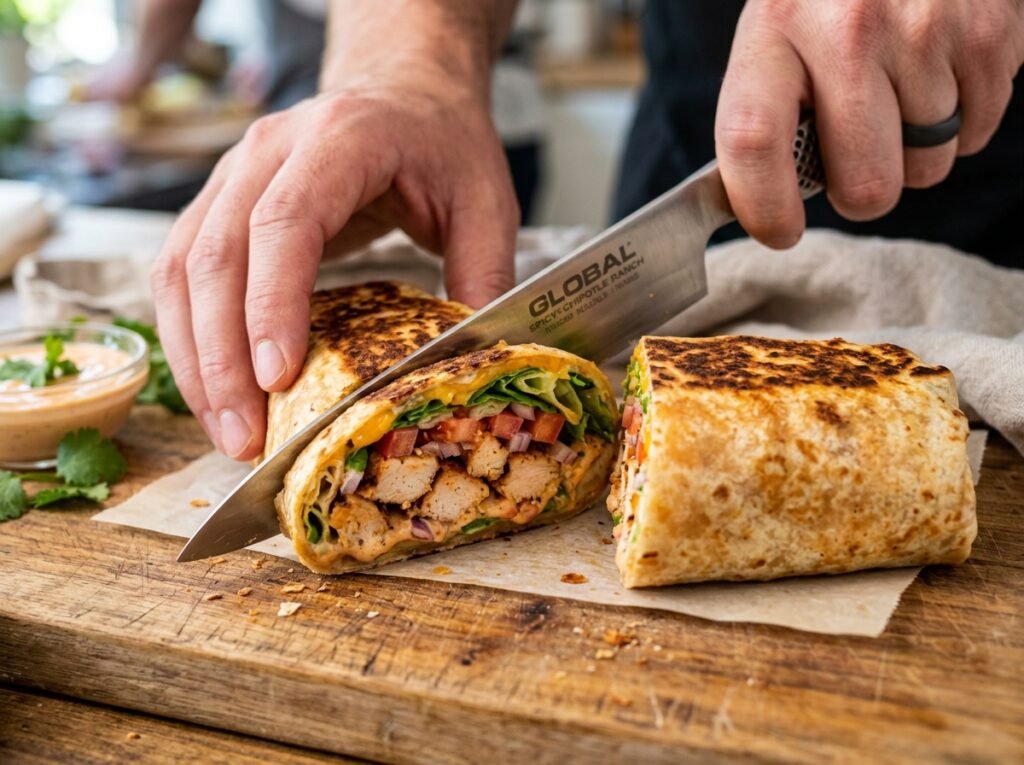
Sealing the Final Seam
Place your assembled wrap seam-side down in a hot skillet. Press down gently with a spatula to ensure the seam makes full contact with the cooking surface. Let it toast for thirty to forty-five seconds until the bottom turns golden brown and crispy.
Carefully flip the wrap and toast the top side for another twenty to thirty seconds. This final sear does two critical things: it seals the seam closed through starch gelatinization, and it creates textural contrast between the crispy exterior and the creamy interior.
Transfer the wrap to a cutting board and let it rest for one minute before slicing it in half on a sharp diagonal. This resting period allows the steam to redistribute and the cheese to set slightly, preventing the filling from spilling out when you cut.

Best Spicy Chipotle Ranch Chicken Wrap Recipe
Ingredients
Equipment
Method
- Pat the chicken breast strips completely dry with paper towels to eliminate surface moisture. Toss the chicken with avocado oil, kosher salt, garlic powder, and smoked paprika until uniformly coated.
- Preheat your cast iron skillet over medium-high heat. Cook the seasoned chicken strips for 4 to 5 minutes per side, until the internal temperature reaches 162°F (72°C). Remove and rest for 5 minutes before building.
- In a small bowl, whisk the ranch dressing, finely minced chipotle peppers, adobo sauce, and fresh lime juice together until smooth and thick.
- Heat the flour tortillas in a dry skillet for 15 seconds to make them pliable. Spread 2 tablespoons of chipotle ranch down the center, then layer the shredded cheese, warm chicken strips, crisp romaine lettuce, and diced tomatoes.
- Fold the top and bottom flaps of the tortilla inward over the filling. Pull the side flap tightly over the ingredients, tucking it snugly, and roll forward into a tight cylinder.
- Place the assembled wrap seam-side down in a hot skillet for 60 seconds until golden brown. This melts the cheese and fuses the starch seam closed. Slice diagonally and serve.
Notes
Chef John’s Insight
Cooking is not just chemistry — it is memory made edible. Every recipe I write carries the weight of tradition and the precision of science. When you take the time to build intelligent moisture barriers inside something as simple as a chicken wrap, you are not just preventing sogginess. You are showing respect for the ingredients, for the person eating the meal, and for the craft of cooking itself. The most powerful moves in the kitchen are almost always the quiet ones. The overnight rest. The proper preheat. The two-minute wait before you plate. In this case, it is the thirty seconds you spend drying your lettuce and warming your tortilla. That small investment transforms a forgettable lunch into something worth remembering.
— Chef John
Nutritional Information
| Nutrient | Per Serving (1 wrap) |
|---|---|
| Calories | 485 kcal |
| Protein | 32g |
| Total Fat | 24g |
| Saturated Fat | 7g |
| Carbohydrates | 35g |
| Dietary Fiber | 3g |
| Sodium | 890mg |
| Cholesterol | 85mg |
Note: Nutritional values are estimates based on standard USDA ingredient databases and assume equal distribution across four servings.
Food Safety Temperature Guidelines
Chicken must always reach an internal temperature of 165°F (74°C) to be safe for consumption. This temperature instantly destroys harmful bacteria like Salmonella and Campylobacter that are commonly present in raw poultry.
The food safety danger zone exists between 40°F (4°C) and 140°F (60°C). Within this temperature range, bacteria multiply rapidly. Never leave raw or cooked chicken at room temperature for more than two hours total, or one hour if the ambient temperature is above 90°F (32°C).
When searing chicken in a hot skillet, use an instant-read thermometer inserted into the thickest part of the meat to verify doneness. Visual cues like color are unreliable—only temperature guarantees safety.
Storage and Reheating Guidelines
| Storage State | Refrigerator | Freezer | Best Reheating Method |
|---|---|---|---|
| Fully assembled wrap | 24 hours maximum | Not recommended | Reheat in a dry skillet over medium-low heat for 3-4 minutes per side until warmed through |
| Cooked chicken (separate) | 3-4 days in airtight container | Up to 3 months | Microwave in 30-second intervals or warm in skillet with a splash of water |
| Chipotle ranch sauce | 5-7 days in sealed jar | Not recommended | Stir well before using; may need to re-emulsify with a whisk |
| Prepped vegetables | 2-3 days in separate containers | Not recommended | Use cold; do not reheat vegetables intended for wraps |
For best results with meal prep, store all components separately in airtight containers and assemble wraps fresh when ready to eat. The tortilla will always taste better when toasted immediately before serving.
Frequently Asked Questions
Can I use Greek yogurt instead of mayonnaise in the ranch sauce?
Yes, but the texture and moisture barrier properties will change. Greek yogurt contains more water than mayonnaise, which makes it a weaker hydrophobic barrier. If you make this substitution, use full-fat Greek yogurt and reduce the buttermilk by half to maintain a thick consistency.
What if I cannot find chipotle peppers in adobo sauce?
You can substitute with one tablespoon of chipotle powder mixed with one tablespoon of tomato paste and a teaspoon of apple cider vinegar. This replicates the smoky heat and tangy depth, though you will miss some of the complex spice notes from the authentic adobo sauce.
How do I adjust the spice level for sensitive palates?
Start with just one minced chipotle pepper and one teaspoon of adobo sauce. Taste the ranch dressing before assembling and gradually add more heat if needed. You can also add an extra tablespoon of mayonnaise to dilute the capsaicin concentration.
Can I make these wraps in an air fryer?
Absolutely. After assembling the wrap, lightly brush the outside with oil and place it seam-side down in your air fryer basket at 375°F (190°C) for four to five minutes until golden and crispy. This creates an even crispier exterior than pan-searing.
Why does my ranch sauce look separated or oily?
This happens when the emulsion breaks, usually because the ingredients were at drastically different temperatures. Make sure your mayonnaise and buttermilk are both at room temperature before whisking. If it breaks, add a teaspoon of cold water and whisk vigorously to re-emulsifys.
More Recipes You’ll Love
Easy Crispy Honey Garlic Chicken Bites Recipe
Cottage Cheese Protein Pancakes
Best Blueberry Cheesecake Overnight Oats Recipe
Best Air Fryer Garlic Bread Pizza Rolls Recipe