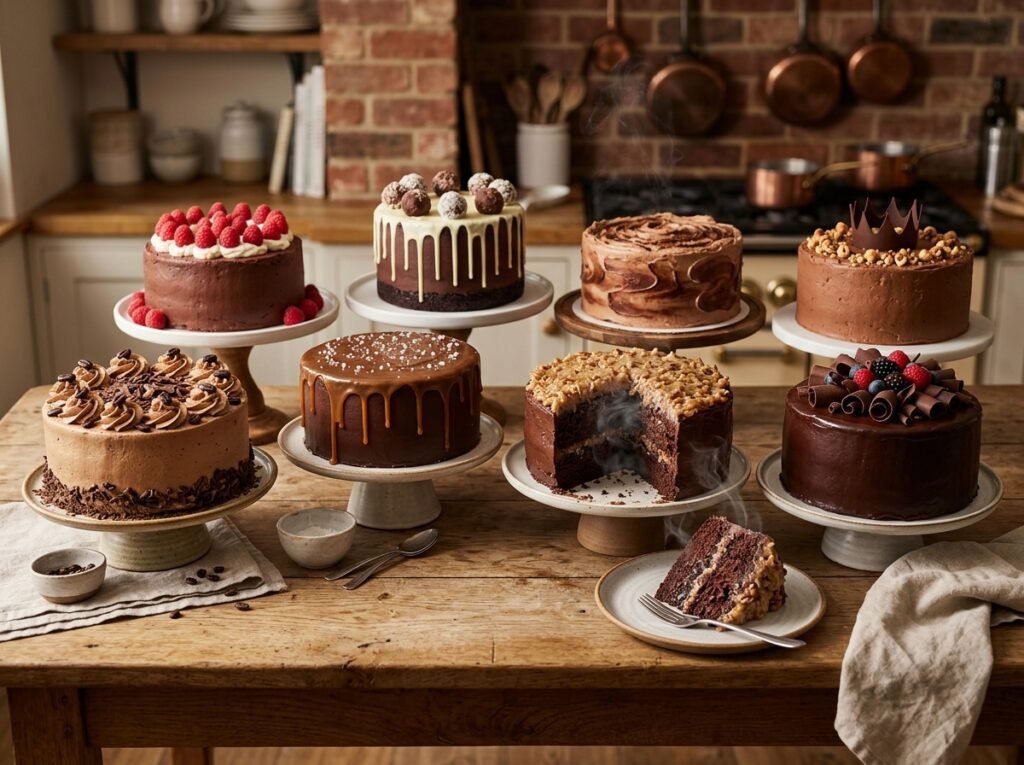
8 Easy Chocolate Cake Recipes Everyone Will Love
By Chef John | Easy Recipes & Smart Cooking Hacks
The Problem With Most Chocolate Cakes (And How to Finally Fix It)
You followed the recipe exactly. You measured everything. You even bought the good cocoa. And somehow, the cake still came out dry, dense, or — worst of all — completely flavorless.
I have been there more times than I care to admit. And I have tested these variations across dozens of batches, adjusting the hydration and fat ratios to find the exact formula for a perfect crumb. The truth is, most chocolate cake failures are not about effort. They are about understanding a handful of small but critical decisions that completely change the outcome.
The good news? Once you understand why certain ingredients do what they do, every single one of these eight recipes becomes practically foolproof. Whether you are craving a classic Sunday layer cake or a five-minute mug cake at midnight, the principles stay the same.
This guide covers eight different easy chocolate cake recipes — each built for a different occasion, a different kitchen situation, and a different kind of craving. Let’s break them all down, starting with the science that makes chocolate cake actually work.
Why Chocolate Cake Is Actually a Chemistry Experiment
Here is where most home bakers lose the game before they even start: they treat the recipe as a formula to follow blindly rather than a system they can understand.
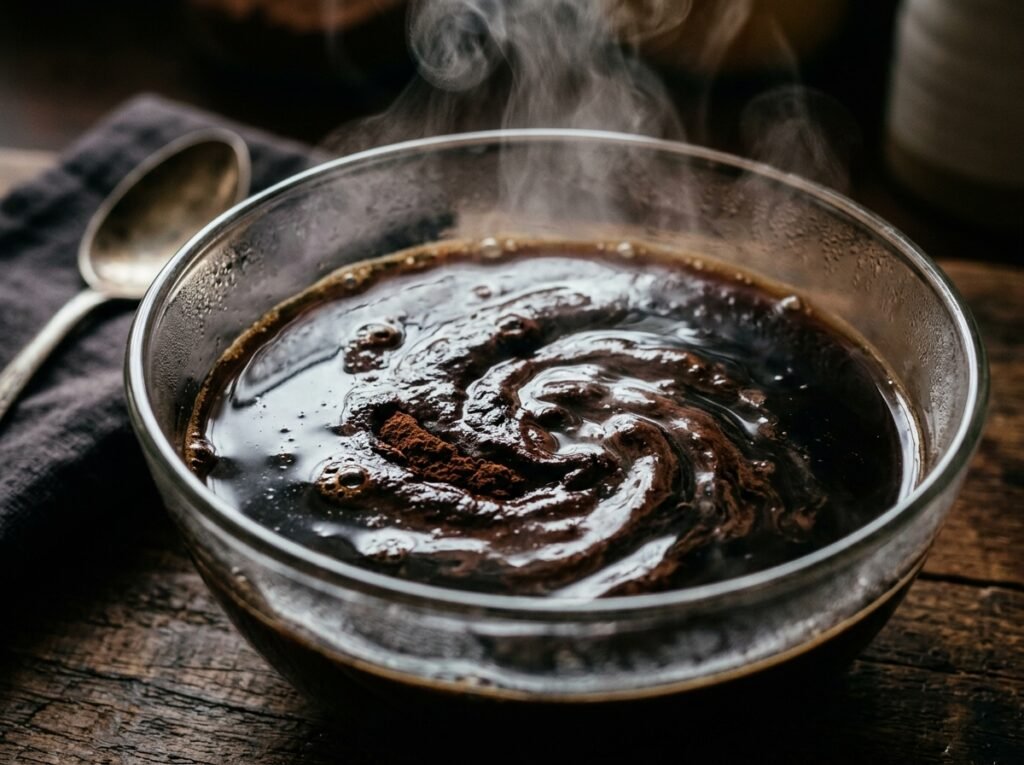
The first thing worth knowing is what cocoa powder actually does in a batter. Cocoa is roughly 50% fat and 50% dry solids, including flavor compounds that are largely locked inside until they hit heat or liquid. When you bloom cocoa — meaning you dissolve it in hot coffee, hot water, or hot butter — you are physically melting those cocoa butter fats and unlocking volatile aromatic compounds that would otherwise stay flat and muted through the bake.
In simple terms: cold cocoa in a batter gives you a faint chocolate flavor. Hot-bloomed cocoa gives you deep, rich, almost fudgy intensity.
The second system worth understanding is your chemical leavener. Baking soda (sodium bicarbonate) requires an acid to activate — buttermilk, sour cream, brown sugar, or natural cocoa powder all qualify. Baking powder contains its own acid, so it works independently. Most great chocolate cakes use a combination of both to get both an immediate rise and a sustained one through the full bake.
The core reaction looks like this:
Acid+Sodium Bicarbonate→Carbon Dioxide (Lift)
In simple terms: the acid and baking soda react to create carbon dioxide bubbles, which expand in the oven heat and give your cake its rise and open crumb structure.
Finally, fat type matters. Oil-based cakes stay moist for days because liquid fat does not solidify at room temperature the way butter does. Butter-based cakes have better flavor right out of the oven but can firm up quickly if overbaked by even a few degrees.
Pro Buying Guide — What to Actually Buy and Where
Cocoa powder is where most people make a quiet, expensive mistake. Let me save you the guesswork.
Hershey’s Special Dark Cocoa is the go-to for most of these recipes. It is dutch-processed, meaning the cocoa has been treated with an alkalizing agent to neutralize its natural acidity. The result is a darker color, smoother flavor, and less bitterness. You can find it at virtually every Walmart, Kroger, and Target across the country for around four dollars.
If you want to go a step further, Rodelle Gourmet Baking Cocoa — available at Whole Foods and on Amazon — is exceptionally rich and works beautifully in the espresso-infused and flourless recipes. For natural cocoa (which you will need for recipes that depend on baking soda activation), Hershey’s Natural Unsweetened or Anthony’s Organic Cocoa Powder from Trader Joe’s or Whole Foods are both reliable.
For flour, King Arthur All-Purpose Flour is the gold standard. It has consistent protein content, which means consistent structure in every bake. Find it at Walmart, Target, or Kroger. For the flourless recipe, skip the flour entirely — but grab Bob’s Red Mill Almond Flour if you want a slightly fudgier texture in that variation.
For chocolate chips used in frostings and mix-ins, Ghirardelli 60% Cacao Bittersweet Chips at Target or Costco give you a much cleaner, more complex melt than standard generic chips.
The 8 Recipes — What Makes Each One Special
Here is a quick look at the eight variations covered in this guide, each built for a different moment or dietary need.
The Classic Buttermilk Chocolate Cake is the benchmark — tall, tender, and beautifully tangy. The One-Bowl Oil-Based Cake is what you make when speed matters and you still want something genuinely delicious. The Flourless Chocolate Cake is dense, fudgy, and almost brownie-like at its core — perfect for gluten-free guests. The Mug Cake is the two-minute midnight solution. The Avocado Chocolate Cake replaces butter fat with avocado fat for a silkier crumb and a nutritional bump. The Sour Cream Rich Chocolate Cake is the most indulgent of the set — use it for birthdays. The Vegan Chocolate Cake uses flax eggs and oat milk with apple cider vinegar to mimic the full buttermilk reaction. And the Espresso-Infused Chocolate Cake uses strong brewed coffee to bloom the cocoa and amplify the chocolate depth without actually tasting like coffee.
Master Ingredients Table
| Ingredient | US Customary | Metric |
|---|---|---|
| All-purpose flour | 1¾ cups | 210g |
| Cocoa powder (dutch-process) | ¾ cup | 75g |
| Granulated sugar | 2 cups | 400g |
| Brown sugar | ½ cup | 100g |
| Baking soda | 1½ tsp | 7g |
| Baking powder | 1 tsp | 4g |
| Fine sea salt | 1 tsp | 6g |
| Large eggs | 2 | 2 |
| Buttermilk | 1 cup | 240ml |
| Neutral oil (canola or avocado) | ½ cup | 120ml |
| Unsalted butter, melted | ¼ cup | 57g |
| Pure vanilla extract | 2 tsp | 10ml |
| Hot brewed coffee | 1 cup | 240ml |
| Sour cream (for variation) | ½ cup | 120g |
| Ripe avocado, mashed (for variation) | ½ large | 80g |
| Flax egg (for vegan: 1 tbsp flax + 3 tbsp water) | 2 flax eggs | — |
| Oat milk (for vegan variation) | 1 cup | 240ml |
| Apple cider vinegar (vegan) | 1 tbsp | 15ml |
| Espresso shot (for espresso variation) | 1 shot / ¼ cup | 60ml |
| Oven temperature (standard) | 350°F | 177°C |
| Pan size (standard layer cake) | 9-inch rounds | 23cm rounds |
⚠️ Common Chocolate Cake Mistakes
| The Mistake | What Actually Happens | The Fix |
|---|---|---|
| Using cold eggs straight from the fridge | Cold eggs do not emulsify properly, creating a lumpy, uneven batter | Set eggs out 30 minutes before baking |
| Skipping the hot liquid bloom | Cocoa flavor stays muted and flat throughout the cake | Always dissolve cocoa in hot coffee or hot water first |
| Overmixing after adding flour | Gluten develops too aggressively, producing a rubbery, dense texture | Fold flour in gently — stop when just combined |
| Opening the oven door too early | The carbon dioxide structure collapses before it sets, causing sinking | Do not open the oven before the 25-minute mark |
| Substituting dutch cocoa for natural without adjusting leavening | Dutch cocoa has no acidity — baking soda won’t activate properly | Use baking powder with dutch cocoa, or swap to natural cocoa with baking soda |
| Frosting a warm cake | Frosting melts, slides, and soaks into the crumb unevenly | Always cool layers completely — minimum 1 hour at room temperature |
👨🍳 Step-by-Step Method: The Master Base Chocolate Cake
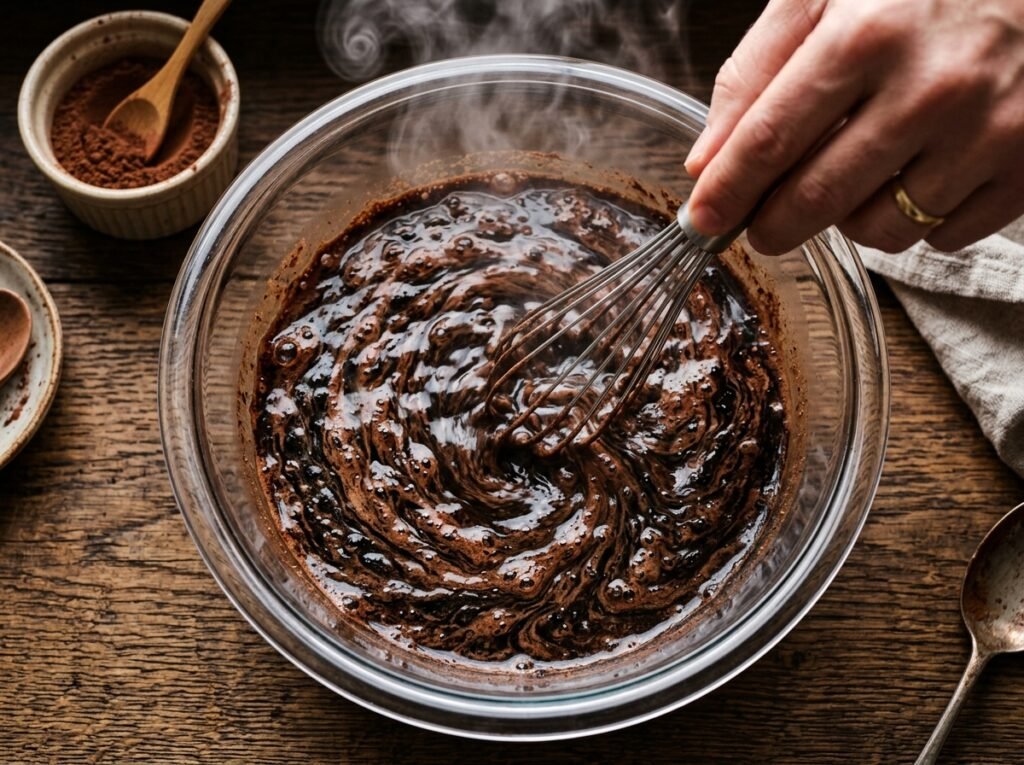
Step One — Bloom the Cocoa First
Before anything else, combine your cocoa powder and hot brewed coffee in a medium bowl and whisk until fully dissolved. This is the single most important step in the entire process. The heat liquefies the cocoa fats and extracts those deep, dark aromatic compounds that give the finished cake its genuine chocolate intensity. Set this aside to cool slightly while you prepare your dry ingredients.
Step Two — Combine Your Dry Ingredients
In a large mixing bowl, whisk together the flour, both sugars, baking soda, baking powder, and salt until completely uniform. Distributing the leaveners evenly at this stage ensures a consistent rise rather than uneven bubbling that creates a domed or cracked surface. Take a full sixty seconds here — it matters more than most people think.
Step Three — Build the Wet Mixture
In a separate bowl, whisk together your eggs, buttermilk, oil, melted butter, and vanilla extract. The combination of oil and butter here is intentional: oil keeps the crumb moist over time, while butter carries fat-soluble flavor compounds that oil alone simply cannot provide. Once the cocoa-coffee mixture has cooled to warm (not hot), add it into the wet ingredients and whisk to combine.
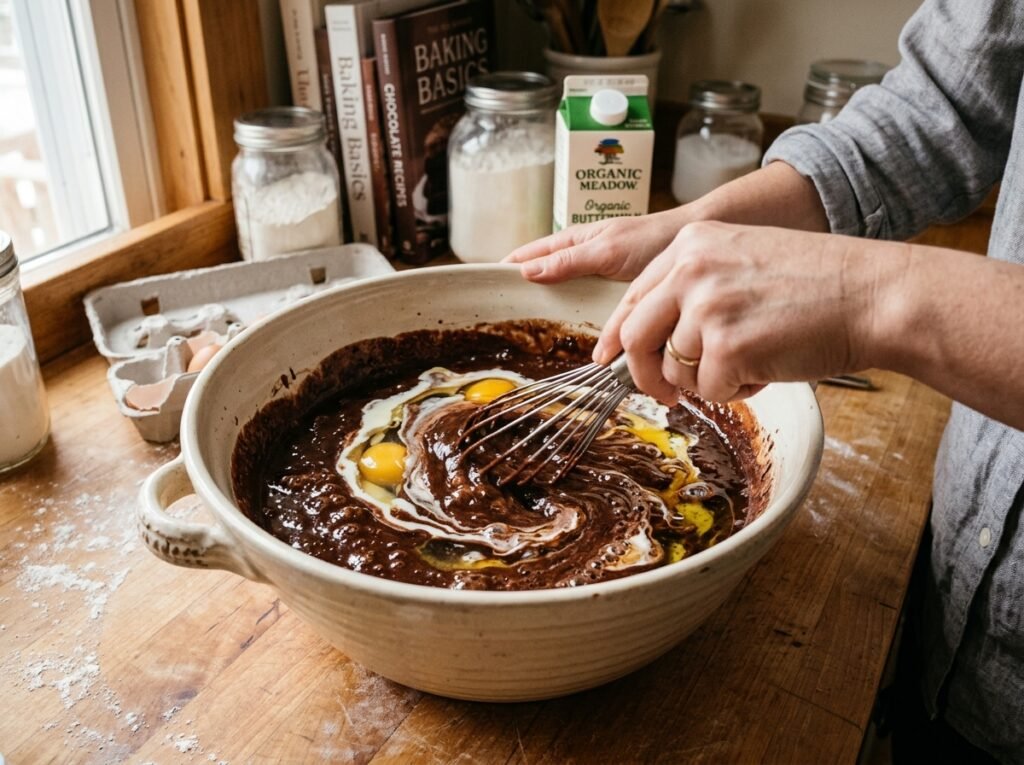
Step Four — Bring It Together
Pour the wet mixture into the dry ingredients and fold gently with a rubber spatula or whisk until just combined. A few small streaks of flour are fine at this stage — they will hydrate fully as the batter sits and then bakes. The moment you stop seeing dry flour clumps, stop mixing. Overmixing from this point develops gluten and turns your cake from tender to tough.
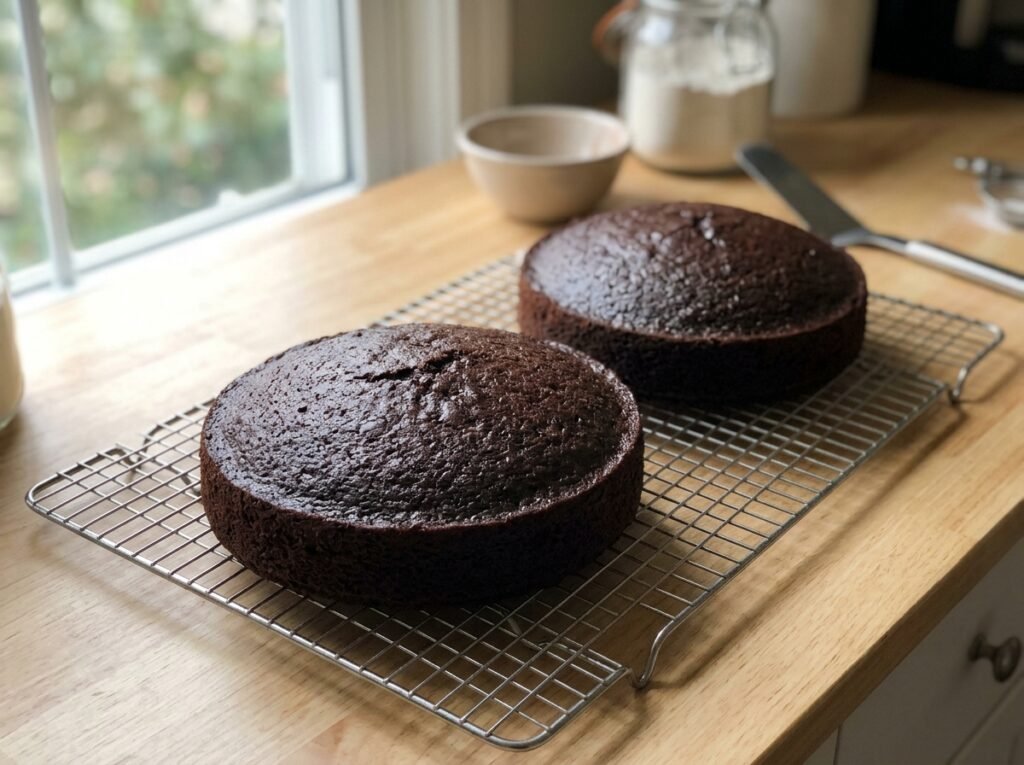
Step Five — Bake Low and Steady
Divide the batter evenly between two greased and parchment-lined 9-inch (23cm) round pans and bake at 350°F (177°C) for 32 to 36 minutes. The cake is done when the edges pull slightly from the pan, the center springs back when lightly pressed, and a digital thermometer inserted into the center reads between 205°F and 210°F (96°C to 99°C). Cool in the pan for 10 minutes, then invert onto a wire rack.

8 Easy Chocolate Cake Recipes Everyone Will Love
Ingredients
Equipment
Method
- Preheat your oven to 350°F / 177°C. Grease two 9-inch round cake pans and line the bottoms with parchment paper. Sift the all-purpose flour, granulated sugar, dark cocoa powder, baking powder, baking soda, and salt together into a large bowl to aerate the starches.
- Add the buttermilk, vegetable oil, room temperature eggs, and vanilla extract to the dry mixture. Whisk vigorously for two minutes until the batter becomes completely smooth, pale, and fully emulsified.
- Carefully pour the boiling water or hot espresso into the batter. Whisk gently until fully incorporated. The batter will be extremely thin and watery, which is necessary to melt the cocoa fats and hydrate the flour proteins perfectly.
- Divide the liquid batter evenly between your prepared cake pans. Bake for 30 to 35 minutes. Test the center with a digital thermometer; it is perfectly baked when the internal temperature reads between 205°F / 96°C and 210°F / 99°C.
- Remove the pans from the oven and let them rest on a wire cooling rack for exactly 10 minutes. Run a thin knife around the edges, invert the cakes onto the racks, remove the parchment paper, and let them cool completely to room temperature before frosting.
Notes
- The Hot Liquid Bloom: Using boiling water or hot espresso doesn’t cook the eggs; instead, it safely melts and activates the cocoa solids, deepening the chocolate flavor profiles instantly.
- Buttermilk Substitute: If out of whole buttermilk, mix 1 tablespoon of fresh lemon juice or white vinegar into 1 cup of whole milk. Let it stand for 5 minutes before using.
- Room Temperature Eggs: Cold eggs will seize the vegetable oil and buttermilk emulsion. Submerge cold eggs in warm water for 5-10 minutes to bring them to room temperature quickly.
- Storage Hack: Thanks to the vegetable oil and buttermilk, this cake stays incredibly moist. Store components wrapped tightly in plastic wrap at room temperature for up to 3 days, or freeze un-frosted layers for up to 2 months.
- Preventing Domed Tops: Bake at exactly 350°F. If your oven runs hot, the edges set too quickly, forcing the center to dome and crack. Use an oven thermometer to verify the temperature.
Chef John’s Insight
Chocolate cake is one of those recipes that people chase for years without realizing they were only a single temperature decision away from getting it right. I have watched talented home bakers struggle not because they lacked skill, but because nobody told them that cocoa powder needs heat to speak. That hot coffee bloom is not optional — it is the conversation starter. The rest of the recipe just listens. When I teach this, I always say: the batter is a system, not a checklist. When you stop following it step by step and start understanding what each ingredient is actually doing in the bowl, everything changes. The cake stops being something you make and starts being something you understand. And that shift — from follower to baker — is where the real magic begins.
— Chef John, Food Hacks Hub
🥗 Nutrition Table (Per Serving — Classic Base Cake, 1 of 12 slices, unfrosted)
| Nutrient | Amount |
|---|---|
| Calories | 285 kcal |
| Protein | 5g |
| Total Fat | 11g |
| Saturated Fat | 3.5g |
| Total Carbohydrates | 44g |
| Sodium | 310mg |
| Cholesterol | 42mg |
All values are estimates calculated using standard ingredients. Actual values vary based on specific brands, portion sizes, and recipe variations used.
🌡️ Food Safety & Baking Temperature Guide
| Stage | Temperature | Notes |
|---|---|---|
| Oven preheat | 350°F / 177°C | Allow full 15-minute preheat before baking |
| Internal cake doneness | 205°F–210°F / 96°C–99°C | Use an instant-read digital thermometer at center |
| Safe egg incorporation | Above 160°F / 71°C | Eggs are fully set — no raw batter concern |
| Danger zone (raw batter) | 40°F–140°F / 4°C–60°C | Do not leave raw batter at room temperature beyond 2 hours |
| Cooling before frosting | Below 75°F / 24°C | Prevents frosting melt and crumb contamination |
A digital instant-read thermometer like the ThermoWorks ThermoPop or Lavatools Javelin removes all guesswork from doneness. At 205°F (96°C), the starch in the flour has fully gelatinized and the egg proteins have completely set — the crumb will be moist but fully stable.
If you want to dive deeper into the rich history and variations of this classic dessert, you can read more about the origins of chocolate cake on Wikipedia.
Storage & Reheating Table
| State | Refrigerator | Freezer | Best Reheat Method |
|---|---|---|---|
| Frosted whole cake | Up to 5 days, covered | Up to 3 months | Slice and bring to room temp 30 min before serving |
| Unfrosted cake layers | Up to 4 days, wrapped in plastic | Up to 3 months | Thaw overnight in fridge, then room temp 1 hour |
| Individual slices (frosted) | Up to 4 days | Up to 2 months | 10–15 sec in microwave at 50% power |
| Mug cake (fresh only) | Not recommended for storage | Not applicable | Consume immediately for best texture |
FAQ — Real Questions Home Bakers Ask
Can I replace hot coffee with hot water?
Yes, absolutely. Hot water still blooms the cocoa and adds moisture. The coffee simply amplifies the chocolate flavor without making the cake taste like coffee. If you are baking for kids or caffeine-sensitive guests, hot water works perfectlys
Why did my cake sink in the middle?
The two most common causes are underbaking and opening the oven door too early. The center structure is the last part to set, and if the carbon dioxide bubbles collapse before the proteins and starches have firmed up, the center drops. Use a thermometer — if it reads below 200°F (93°C), it needs more time.
Can I use this batter for cupcakes?
Yes, and it works beautifully. Fill cupcake liners two-thirds full and bake at 350°F (177°C) for 18 to 22 minutes. The same thermometer test applies — look for 205°F (96°C) at the center.
What is the difference between natural and dutch-process cocoa, really?
Natural cocoa is acidic and reacts with baking soda to create lift. Dutch-process cocoa has been neutralized, so it will not activate baking soda — it needs baking powder instead. Swapping them without adjusting your leavener is one of the most common causes of flat, dense cakes.
Can I make these recipes ahead for a party?
The unfrosted layers freeze exceptionally well for up to three months. Wrap each cooled layer tightly in two layers of plastic wrap, then foil. Thaw in the refrigerator overnight and frost the day of serving for the freshest result.
🔗 Keep Baking With These
If this chocolate cake guide hit the spot, here are two recipes that pair perfectly with everything you just made:
7 Amazing Crispy Air Fryer Chicken Wings Recipe
Easy Mexican Street Corn Salad Recipe
Easy Crispy Honey Garlic Chicken Bites Recipe